You might be thinking that making braided bread is complicated and time-consuming, but let me assure you that it’s actually quite simple and rewarding.
With just a few basic ingredients and some patience, you can create a beautifully braided loaf that will impress both your family and guests.
But before we get into the step-by-step instructions, let me share with you a secret ingredient that will take your bread to the next level. Curious to know what it is? Well, keep reading and all will be revealed.
Contents
- 1 Key Takeaways
- 2 Ingredients Needed for the Braided Bread Recipe
- 3 Step-By-Step Instructions for Preparing the Dough
- 4 Tips for Achieving the Perfect Texture and Rise
- 5 How to Shape and Braid the Bread for an Impressive Presentation
- 6 Braided Bread Recipe
- 7 Baking and Finishing Touches for a Golden and Delicious Loaf
- 8 Nutrional facts
- 9 Serving Suggestions and Storing Leftovers for Later Enjoyment
- 10 Frequently Asked Questions
- 11 Conclusion
Key Takeaways
- Accurate measurement of ingredients and using fresh yeast are crucial for achieving the perfect texture and rise of the braided bread.
- Providing a warm and draft-free environment and allowing the dough to double in size during the rising process is important.
- Shaping and braiding the bread into an impressive presentation involves dividing the dough, rolling it into ropes, and crossing them to braid.
- To achieve a golden and delicious loaf, preheating the oven, introducing steam during baking, and brushing with an egg wash are recommended techniques.
Ingredients Needed for the Braided Bread Recipe
To create a delicious braided bread, you’ll need a handful of essential ingredients that will transform your kitchen into a bakery. The beauty of braided bread lies in its intricate patterns and the unique combination of flavors. There are various braiding styles you can experiment with to add your personal touch to the bread. Whether it’s a simple three-strand braid or a more complex six-strand braid, each style adds a touch of elegance to the final product.
Now, let’s talk about the ingredients. The basic ones include flour, yeast, sugar, salt, and water. However, if you’re feeling adventurous, you can try alternative ingredients to give your braided bread a twist. Instead of using regular white flour, you can use whole wheat flour or a combination of different types of flour for added flavor and texture. You can also substitute sugar with honey or maple syrup to enhance the sweetness.
Additionally, you can experiment with different fillings such as cheese, chocolate, or fruits to make your braided bread even more enticing. These alternative ingredients will take your braided bread to a whole new level, giving you the freedom to create unique and mouthwatering combinations.
Step-By-Step Instructions for Preparing the Dough
Start by gathering all the necessary ingredients and preparing your workspace for dough preparation. Clear a clean, spacious area on your countertop and dust it lightly with flour. This will ensure that your dough doesn’t stick and make the kneading process easier.
Now, let’s dive into the step-by-step instructions for preparing the dough:
- Combine the flour, yeast, salt, and sugar in a large mixing bowl. Make sure to mix them well to evenly distribute the ingredients.
- Create a well in the center of the dry mixture and pour in the warm water and melted butter. Stir everything together until a shaggy dough forms.
- Transfer the dough onto the floured countertop and knead it for about 10 minutes. Use the heel of your hand to push the dough away from you, then fold it back over itself. Repeat this motion until the dough becomes smooth and elastic.
- If the dough feels too sticky, add a little more flour. Conversely, if it feels too dry, sprinkle a small amount of water. Troubleshooting common dough issues will help you achieve the perfect consistency.
Tips for Achieving the Perfect Texture and Rise
For a bread with the perfect texture and rise, there are a few key tips to keep in mind. Achieving fluffiness in your braided bread requires attention to detail and proper technique.
One common issue is dense or heavy bread, which can result from using too much flour or not enough yeast. To troubleshoot this problem, make sure to measure your ingredients accurately and use fresh yeast.
Another common issue is a lack of rise in the dough. To ensure a good rise, the dough needs a warm and draft-free environment. You can achieve this by placing the dough in a lightly greased bowl, covering it with a damp cloth, and placing it in a warm spot, like near a window or on top of a preheated oven.
It’s also important to give the dough enough time to rise. Be patient and allow it to double in size before moving on to the next step.
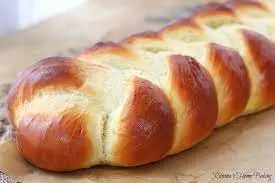
How to Shape and Braid the Bread for an Impressive Presentation
Now that you’ve mastered the art of achieving the perfect texture and rise for your braided bread, it’s time to move on to the next step: shaping and braiding the dough for an impressive presentation.
To shape the dough, gently pat it into a rectangle and divide it into equal portions.
Then, roll each portion into long ropes and proceed to braid them together using your preferred technique.
With a little practice, you’ll be able to create beautifully braided bread that’s sure to impress your family and friends.
Shaping the Dough
To shape and braid your bread dough for an impressive presentation, follow these simple yet effective techniques.
- Start by dividing the dough into equal portions. This will ensure even braiding and a uniform appearance.
- Roll each portion into a long rope shape, keeping the thickness consistent throughout. This will allow for smooth and seamless braids.
- Lay the ropes of dough parallel to each other on a lightly floured surface. Make sure they’re touching, but not overlapping.
- Begin the braiding process by crossing the right rope over the middle rope, then the left rope over the new middle rope. Repeat this pattern until you reach the end.
- Pinch the ends together to seal the braid and tuck them underneath for a neat finish.
- Troubleshoot common shaping mistakes by gently reshaping the dough if it becomes misshapen or uneven during braiding.
- Remember, practice makes perfect, so don’t be discouraged if it doesn’t turn out perfectly the first time. With a little patience and persistence, you’ll soon master the art of shaping and braiding bread dough.

Braiding Techniques
To create an impressive presentation for your braided bread, master the art of shaping and braiding the dough with these simple yet effective techniques.
When it comes to braiding, there are different patterns you can try to add variety and visual appeal to your bread. The three-strand braid is the most basic and can be easily achieved by crossing the right strand over the middle strand, then crossing the left strand over the new middle strand. Repeat until the end.
For a more intricate look, you can experiment with four or even six strands.
Additionally, if you want to switch things up, you can explore alternative bread shapes like rolls, twists, or even a wreath shape.
Let your creativity run wild and have fun with the process. Your braided bread will surely be the star of any gathering.
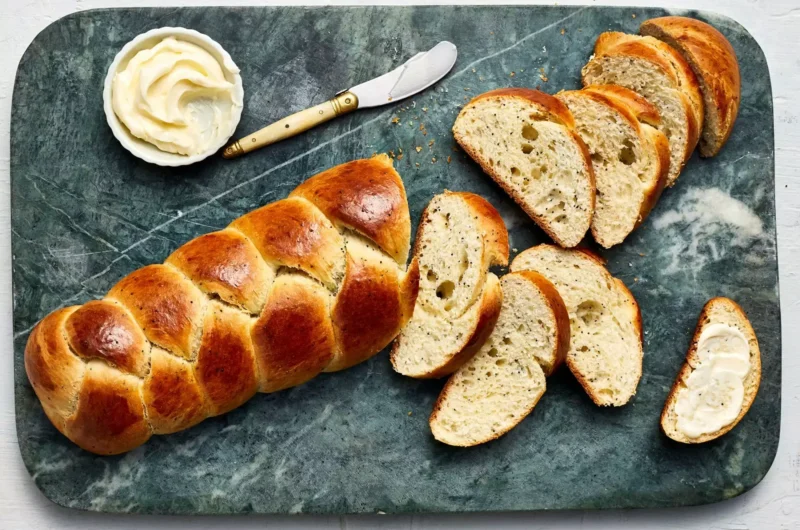
Braided Bread Recipe
Course: Baking (Bread)Cuisine: Various (Braided bread is a versatile recipe found in many cultures)Difficulty: Moderate8
30
minutes35
minutes150
kcalBraided Bread is a delightful baked treat that combines the warmth of freshly baked bread with an artistic touch. This recipe involves crafting a soft, elastic dough, which is then divided, rolled into ropes, and intricately braided together before baking to golden perfection. The result is a visually stunning loaf with a tender crumb and a hint of sweetness, perfect for any occasion from breakfast to tea time.
Ingredients
Flour
Yeast
Water
Sugar
Directions
- Prepare dough by combining flour, yeast, water, and sugar, then knead until smooth.
- Let dough rise until doubled in size, then divide into equal portions and roll into ropes.
- Braid ropes together and transfer to a baking sheet, allowing to rise again.
- Bake in a preheated oven until golden brown and cooked through.
Baking and Finishing Touches for a Golden and Delicious Loaf
Achieve a golden and delicious loaf by carefully tending to the baking process and adding the perfect finishing touches. To ensure your bread turns out beautifully, here are some essential baking techniques and tips for achieving a golden crust:
- Preheat your oven: To create that perfect golden color, it’s crucial to preheat your oven to the correct temperature. This will help the bread bake evenly and develop a lovely crust.
- Use steam: One secret to achieving a golden and crusty loaf is to introduce steam during the baking process. You can do this by placing a shallow pan filled with water on the bottom rack of the oven or by spritzing water onto the bread before placing it in the oven. The steam helps create a moist environment, allowing the crust to develop a beautiful golden color.
- Brush with an egg wash: For an extra touch of golden goodness, brush your bread with an egg wash before baking. This simple mixture of beaten egg and water adds a glossy sheen and enhances the color of the crust.
Nutrional facts
Serving Size: 1 slice (about 50g)
Calories: Approximately 150 calories
Total Fat: 3g
Saturated Fat: 1g
Cholesterol: 20mg
Sodium: 150mg
Total Carbohydrates: 28g
Dietary Fiber: 1g
Sugars: 6g
Protein: 4g
Serving Suggestions and Storing Leftovers for Later Enjoyment
For a delightful dining experience, explore creative serving suggestions and learn how to store leftovers to savor later.
Once you’ve baked your delicious braided bread, there are many ways to serve it that will impress your guests and elevate the enjoyment of your meal. One serving suggestion is to slice the bread into thick pieces and serve it with a variety of spreads, such as homemade hummus, garlic butter, or a tangy tomato chutney. Another idea is to use the braided bread as a base for a gourmet sandwich, filling it with your favorite meats, cheeses, and vegetables. The soft and fluffy texture of the bread will perfectly complement the flavors of your fillings.
Now, what do you do with the leftovers? Don’t let them go to waste! There are plenty of creative uses for leftover braided bread. You can turn it into croutons by cutting it into small cubes, tossing them with olive oil, and toasting them in the oven until they become crispy. These croutons can be used to top salads or soups, adding a delicious crunch. Another option is to use the leftover bread to make a savory bread pudding. Tear the bread into small pieces, mix it with eggs, milk, cheese, and your favorite vegetables or meats, and bake it until golden and bubbly. It’s a comforting and hearty dish that makes for a satisfying meal.
Lastly, you can also freeze the leftover braided bread for later enjoyment. Simply wrap it tightly in plastic wrap and store it in the freezer. When you’re ready to enjoy it again, just thaw it at room temperature or warm it up in the oven. Whether you choose to serve it in creative ways or repurpose it for other dishes, the braided bread will continue to bring joy to your meals even after it has been baked.
Frequently Asked Questions
How Long Does It Take for the Dough to Rise?
You can speed up the rising process by using alternative methods like a warm oven or placing the dough in a sunny spot. If your dough isn’t rising, check the yeast, temperature, and moisture levels.
Can I Use Whole Wheat Flour Instead of All-Purpose Flour?
You can definitely use whole wheat flour instead of all-purpose flour in the recipe. Whole wheat flour adds more fiber and nutrients to your bread, making it a healthier option.
Can I Substitute the Sugar With a Healthier Alternative?
You can definitely substitute the sugar in your recipe with healthier alternatives. Try using honey, maple syrup, or even mashed bananas for a natural sweetness. Experiment and find what suits your taste buds best!
Can I Freeze the Braided Bread Before Baking It?
Sure, you can freeze the braided bread before baking it. This freezing technique allows you the freedom to prepare ahead of time. And don’t forget, you can also experiment with alternative fillings for added excitement!
How Long Can I Store the Leftover Bread and How Should I Store It?
You can store the leftover bread for up to 3 days. The best way to keep it fresh is to store it in an airtight container or bag at room temperature. Enjoy it anytime!

Conclusion
In the enchanted realm of the kitchen, where dough turns into art, this braided bread recipe weaves together flavors and textures like a tapestry of delight. With its golden crust and soft, pillowy interior, each bite transports you to a world of culinary bliss.
So gather your ingredients, follow the steps with care, and soon you’ll be savoring a masterpiece that will surely leave your taste buds begging for an encore.
Let the magic of braided bread unfold in your home today.