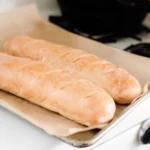
Are you tired of store-bought bread that lacks character and flavor? Look no further, because we have the perfect recipe for you – the legendary San Francisco Sourdough Bread.
This recipe takes you back in time, allowing you to experience the traditional art of bread-making. With its tangy taste and chewy texture, this bread is truly a culinary masterpiece.
But how exactly do you achieve that iconic San Francisco flavor? Stay tuned, because we are about to unveil the secrets behind this timeless recipe that will elevate your bread-baking skills to a whole new level.


Contents
- 1 Key Takeaways
- 2 Ingredients
- 3 Creating the Starter
- 4 Fermentation and Proofing
- 5 Shaping and Scoring the Loaves
- 6 San Francisco Sourdough Bread Recipe
- 7 Baking the Sourdough Bread
- 8 Enjoying Your Homemade San Francisco Sourdough Bread
- 9 Nutrition facts
- 10 Frequently Asked Questions
- 10.1 How Long Does It Take to Make San Francisco Sourdough Bread From Start to Finish?
- 10.2 Can I Use All-Purpose Flour Instead of Bread Flour in the Recipe?
- 10.3 Is It Necessary to Use a Dutch Oven for Baking the Sourdough Bread?
- 10.4 Can I Freeze the Dough or the Baked Bread for Later Use?
- 10.5 Can I Add Additional Ingredients Like Herbs or Cheese to the Sourdough Bread Recipe?
- 11 Conclusion
Key Takeaways
- The sourdough starter is made from fermenting flour and water and is a key ingredient in San Francisco sourdough bread.
- Proper proofing is crucial for achieving the desired texture and flavor in the bread.
- Shaping, scoring, and folding techniques help create a beautiful and well-structured loaf.
- Baking at high temperature with steam is essential for developing a crispy crust.
Ingredients
To make San Francisco sourdough bread, you’ll need a list of essential ingredients. The first and most important ingredient is flour. Various types of flour can be used in sourdough bread recipes, but the most common ones are all-purpose flour, bread flour, and whole wheat flour. All-purpose flour is versatile and produces a lighter loaf, while bread flour has a higher protein content, resulting in a chewier texture. Whole wheat flour adds a nutty flavor and extra nutrition to the bread.
In addition to flour, you’ll need water, salt, and of course, a sourdough starter. The sourdough starter is what gives the bread its distinct sour taste and is made by fermenting a mixture of flour and water. It’s like a living organism that needs to be fed and maintained regularly.
To achieve the perfect crust on your sourdough bread, you need to pay attention to the baking process. Preheating your oven at a high temperature and using steam during the initial stage of baking helps create a crispy and golden crust. You can also brush the loaf with water or egg wash before baking to enhance the crust’s appearance and flavor.
Creating the Starter
To create the starter for your San Francisco sourdough bread, you’ll need a few simple ingredients. These include flour, water, and a pinch of salt.
The process of activating the starter involves combining these ingredients and allowing them to ferment over a period of several days. This fermentation process is crucial in developing the distinctive tangy flavor of San Francisco sourdough.
Ingredients for the Starter
For creating the starter, you’ll need a few simple ingredients. The first and most important ingredient is flour. You can use either all-purpose flour or bread flour, depending on your preference. Some people even use whole wheat flour for a nuttier flavor. The second ingredient is water. You’ll need filtered or non-chlorinated water to avoid any unwanted chemicals that can inhibit fermentation. Lastly, you’ll need a small amount of an existing sourdough starter or commercial yeast to kickstart the fermentation process.
When it comes to different types of sourdough starters, there are two main options: a liquid starter and a stiff starter. A liquid starter has a higher hydration level, making it easier to mix and maintain. On the other hand, a stiff starter has a lower hydration level, resulting in a more robust and tangy flavor.
To maintain and feed your sourdough starter, you’ll need to keep it at room temperature and feed it regularly with equal parts flour and water. This will provide the yeast and bacteria with the nutrients they need to thrive. It’s important to discard a portion of the starter before each feeding to prevent it from becoming too acidic.
Steps to Activate the Starter
To activate the starter and begin the process of creating your San Francisco sourdough bread, you’ll need to follow a few simple steps.
First, combine equal parts of flour and water in a clean glass or plastic container. Stir well until the mixture is smooth. Cover the container loosely with a clean cloth and let it sit at room temperature for 24 hours.
After 24 hours, you’ll notice some bubbles forming on the surface of the mixture. This is a sign that the activation process has begun.
Now, discard half of the mixture and add equal parts of flour and water again. Stir well and cover loosely. Repeat this process every 24 hours for the next 5-7 days, discarding half and adding fresh flour and water each time.
This will help develop a strong and active sourdough starter.
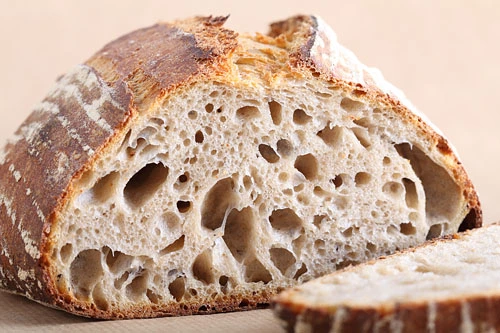
Fermentation and Proofing
Now that you have successfully created your sourdough starter, it’s time to understand the fermentation process and the importance of proper proofing.
Fermentation is the magical transformation of the dough where the wild yeast and bacteria work together to develop flavor and texture.
Proper proofing, on the other hand, allows the dough to rise to its full potential, resulting in a light and airy loaf.
To ensure successful fermentation and proofing, it’s crucial to maintain the right temperature, hydration level, and timing.
Fermentation Process Explained
During the fermentation process, the sourdough dough develops its unique tangy flavor and airy texture through the action of wild yeast and lactic acid bacteria. This natural fermentation process has several benefits that contribute to the deliciousness of San Francisco sourdough bread.
- Wild yeast: The wild yeast present in the dough consumes the sugars and produces carbon dioxide gas, which creates the bread’s airy texture.
- Lactic acid bacteria: These bacteria produce lactic acid, which adds to the tangy flavor of the bread.
- Longer fermentation time: The extended fermentation time allows for the flavors to develop fully, resulting in a more complex and delicious bread.
Importance of Proper Proofing
Proper proofing is crucial for achieving the desired texture and flavor in San Francisco sourdough bread. It is during this stage that the dough undergoes fermentation, allowing it to rise and develop its characteristic tangy flavor. To ensure successful proofing, it is important to follow proper proofing techniques and troubleshoot any proofing issues that may arise.
One key aspect of proper proofing is determining the ideal proofing time. This can vary depending on factors such as room temperature, dough hydration, and the desired level of sourness. Underproofing can result in a dense and underdeveloped loaf, while overproofing can lead to a collapsed and overly sour bread.
To help you achieve the perfect proofing, refer to the table below for some common proofing troubleshooting tips:
| Proofing Issue | Possible Cause | Solution |
|---|---|---|
| Slow Proofing | Low room temperature | Place the dough in a warmer spot or use a proofing box |
| Overproofing | High room temperature or excessive fermentation time | Reduce the proofing time or place the dough in a cooler spot |
| Uneven Proofing | Inadequate dough shaping or uneven distribution of yeast | Ensure proper shaping and yeast distribution during the initial fermentation |
Tips for Successful Fermentation
For successful fermentation and proofing, it’s essential to ensure that the dough is given enough time to develop its flavors and rise to the desired consistency. Here are some tips to help you achieve successful fermentation and techniques for flavor development:
- Temperature control: Maintaining a consistent temperature is crucial for fermentation. Keep the dough in a warm environment, around 75°F (24°C), to encourage yeast activity and flavor development.
- Longer fermentation: Allowing the dough to ferment for a longer period, typically overnight, enhances the flavor and texture of the bread. This slow fermentation process allows the flavor to deepen and develop complexity.
- Regular folding: During fermentation, gently fold the dough every 30 minutes for the first few hours. This technique helps strengthen the gluten structure and distributes the yeast and bacteria throughout the dough.
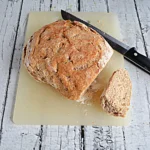
Shaping and Scoring the Loaves
To shape and score the loaves of San Francisco Sourdough Bread, you will follow a precise technique that ensures a beautifully formed and artfully scored final product. Shaping techniques play a crucial role in giving the bread its characteristic shape and structure, while scoring techniques help create a beautiful pattern on the surface of the loaf.
Here is a breakdown of the shaping and scoring techniques involved in making San Francisco Sourdough Bread:
| Shaping Techniques | Scoring Techniques |
|---|---|
| Pre-shaping: Divide the dough and gently shape each portion into a round ball. | Cross Scoring: Make a shallow cross-shaped cut on the top of the loaf. |
| Bench Rest: Allow the dough to rest for a short period, usually around 15-20 minutes. | Diamond Scoring: Create diagonal cuts across the surface of the loaf to form a diamond pattern. |
| Final Shaping: Tightly shape the dough into its desired form, whether it be a boule or a batard. | Spiral Scoring: Score the loaf in a spiral pattern, starting from the center and working your way outwards. |
| Proofing: Let the shaped dough rise until it has doubled in size. | Leaf Scoring: Make long, curved cuts resembling leaves to create an artistic design. |

San Francisco Sourdough Bread Recipe
Course: breadCuisine: AmericanDifficulty: Intermediate4
servings30
minutes40
minutes300
kcalEmbark on the journey of crafting your own San Francisco Sourdough Bread with this intermediate-level recipe. The adventure begins with creating and nurturing your sourdough starter, a dynamic mixture of flour and water that captures the wild yeast and bacteria responsible for the unique flavor profile.
Ingredients
1 cup all-purpose flour
1/2 cup lukewarm water
1 cup active sourdough starter
1 1/2 cups lukewarm water
4 cups bread flour
1 1/2 teaspoons salt
Directions
- Mix 1 cup of all-purpose flour with 1/2 cup of lukewarm water in a glass or plastic container. Stir well to combine.
- Cover loosely and let it sit at room temperature for 24 hours.
- After 24 hours, discard half of the mixture and feed the remaining with 1 cup of flour and 1/2 cup of water. Mix well.
- Repeat this process daily for 5-7 days until the starter is active, bubbly, and has a slightly tangy smell.
- Add 4 cups of bread flour and 1 1/2 teaspoons of salt. Mix until a rough dough forms.
- Knead the dough on a floured surface for about 10-15 minutes until it becomes smooth and elastic.
- Place the dough back into the mixing bowl, cover with a damp cloth, and let it rise at room temperature for about 4-6 hours, or until it doubles in size. You can also let it rise in the refrigerator overnight for a slower fermentation.
- After the first rise, shape the dough into a round or oval loaf.
- Optional: Score the top of the bread with a sharp knife or razor blade to allow for controlled expansion during baking.
- Allow the bread to cool completely before slicing.
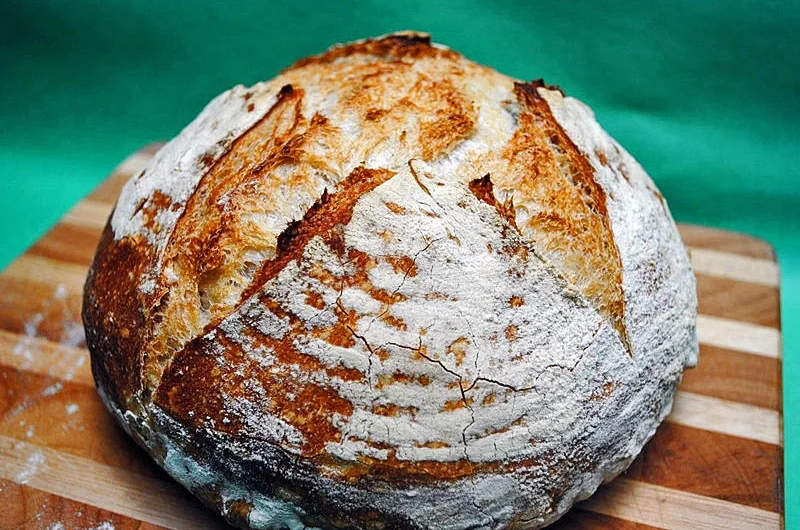
Baking the Sourdough Bread
After shaping and scoring the loaves of San Francisco Sourdough Bread, it’s time to move on to the next crucial step: baking the bread to perfection. This is where the magic happens and the flavors truly develop, creating that iconic crust and tangy taste that San Francisco sourdough is known for.
Here are three key elements to keep in mind as you prepare to bake your sourdough bread:
- Folding technique: Throughout the fermentation process, it’s important to periodically fold the dough. This technique helps redistribute the yeast and bacteria, promoting even fermentation and improving the bread’s structure. Gently lift the edges of the dough and fold them towards the center, rotating the dough as you go. This process strengthens the gluten network, resulting in a better rise and overall texture.
- Crust development: To achieve that classic crispy crust, it’s essential to create the right baking environment. Preheat your oven and baking stone or Dutch oven to a high temperature. The initial burst of heat helps the dough expand quickly, creating a desirable oven spring. Additionally, you can create steam in the oven by placing a pan of hot water on the bottom rack or spritzing the dough with water before baking. Steam keeps the dough’s surface moist during the first few minutes of baking, allowing the crust to develop beautifully.
- Timing and temperature: The final key to successful sourdough bread baking is getting the timing and temperature just right. Follow your recipe’s instructions for the initial high-temperature bake to establish the crust and structure. Then, reduce the temperature and continue baking until the bread reaches an internal temperature of around 200°F (93°C). This ensures that the bread is fully cooked inside without burning the crust.

Enjoying Your Homemade San Francisco Sourdough Bread
Indulge in the satisfying taste and texture of your homemade San Francisco Sourdough Bread. After all the effort you put into baking it, it’s time to enjoy the fruits of your labor. The tangy aroma fills the air as you slice through the crust, revealing the soft, chewy interior. The crust is delightfully crisp, creating a perfect contrast with the tender crumb.
Now, let’s talk about making variations to your sourdough bread. You can add different ingredients to customize the flavor and texture. Try incorporating herbs like rosemary or thyme for a savory twist. For a touch of sweetness, add dried fruits or nuts. Experiment with different combinations until you find your favorite variation.
When it comes to storing leftovers, it’s important to keep your sourdough bread fresh for as long as possible. Store it in a paper bag or bread box to maintain its crustiness. Be sure to avoid storing it in plastic bags, as it can cause the bread to become soggy. If you have a large loaf, you can slice and freeze individual portions for later enjoyment. To reheat, simply toast the slices or warm them in the oven for a few minutes.
Now that you know how to enjoy your homemade San Francisco Sourdough Bread, sit back, relax, and savor every bite. The possibilities are endless, and your taste buds will thank you for it.
Nutrition facts
- Calories: 250-300 kcal
- Protein: 8-10g
- Carbohydrates: 50-60g
- Dietary Fiber: 2-4g
- Sugars: 0-1g
- Fat: 1-2g
- Saturated Fat: 0g
- Trans Fat: 0g
- Cholesterol: 0mg
- Sodium: 600-700mg
Frequently Asked Questions
How Long Does It Take to Make San Francisco Sourdough Bread From Start to Finish?
To make San Francisco sourdough bread from start to finish, it takes time and patience. You’ll need to create a sourdough starter and follow the steps carefully. Don’t forget to use these tips for achieving the perfect crust!
Can I Use All-Purpose Flour Instead of Bread Flour in the Recipe?
Yes, you can use all-purpose flour instead of bread flour in the recipe. However, keep in mind that bread flour has higher protein content which contributes to a stronger structure and chewier texture in your bread.
Is It Necessary to Use a Dutch Oven for Baking the Sourdough Bread?
You don’t need a fancy Dutch oven to bake sourdough bread, but let me tell you, it’s like having a sports car in the kitchen! The heat retention and steam help create that crust you crave. Try it, freedom-seeker!
Can I Freeze the Dough or the Baked Bread for Later Use?
Yes, you can freeze the dough or the baked bread for later use. Freezing the dough allows you to have freshly baked bread whenever you want. Storing the baked bread in the freezer helps to maintain its freshness and prevent it from going stale.
Can I Add Additional Ingredients Like Herbs or Cheese to the Sourdough Bread Recipe?
You can definitely add additional ingredients like herbs or cheese to your sourdough bread recipe. It can enhance the flavor and create a unique twist. Just be mindful of the balance and not overpowering the sourdough taste.


Conclusion
So there you have it, your very own homemade San Francisco sourdough bread! With its tangy flavor and chewy texture, this bread is sure to be a hit at any gathering.
Whether you enjoy it sliced and toasted with butter or as the perfect companion to a warm bowl of soup, this bread is a true delight.
So grab a slice, savor the moment, and relish in the satisfaction of creating something truly special.
Happy baking!