

You crave the warm, comforting aroma of freshly baked bread, but the thought of actually making it seems daunting. Fear not, for Miss Bread Recipe is here to guide you through the process with ease and precision.
With just a few simple ingredients and a little bit of patience, you’ll be able to create your own delicious homemade bread, perfect for any occasion.
But before we dive into the step-by-step instructions, there’s something you need to know – a secret ingredient that will elevate your bread to a whole new level. Curious? Well, you’ll just have to keep reading to find out.

Contents
- 1 Key Takeaways
- 2 Ingredients
- 3 Mixing the Dough
- 4 Kneading and Shaping
- 5 Proofing the Dough
- 6 Baking Instructions
- 7 Miss Bread Recipe
- 8 Enjoying Your Homemade Bread
- 9 Nutrition facts
- 10 Frequently Asked Questions
- 10.1 Can I Substitute Any of the Ingredients in the Señorita Bread Recipe?
- 10.2 How Long Does It Typically Take for the Dough to Rise During the Proofing Process?
- 10.3 Can I Freeze the Dough and Bake It Later?
- 10.4 What Can I Do if the Dough Is Too Sticky During the Kneading Process?
- 10.5 How Should I Store the Baked Señorita Bread to Keep It Fresh for Longer?
- 11 Can I Use Cherry Bread Recipe to Make Miss Bread?
- 12 Conclusion
Key Takeaways
- The basic ingredients for bread are flour, yeast, water, salt, and sugar.
- The dough should have a slightly sticky and elastic consistency.
- Kneading the dough develops gluten and gives the bread structure and texture.
- Proofing the dough at the ideal temperature range allows the yeast to ferment and create a light and airy texture.
Ingredients
To create the perfect Miss Bread, you’ll need a carefully selected list of ingredients. When it comes to making bread, the possibilities are endless. There are so many different types of bread variations you can try, from classic white bread to hearty whole wheat or even flavorful sourdough. As a beginner baker, it’s important to start with simple recipes and gradually experiment with different flavors and techniques. Here are a few tips to help you get started.
First and foremost, make sure you have the basic ingredients on hand: flour, yeast, water, salt, and sugar. These are the building blocks of any bread recipe. You can choose between all-purpose flour or bread flour, depending on the texture and density you prefer. Yeast is essential for leavening the dough and giving the bread its light and airy texture. Water helps activate the yeast and bind the ingredients together. Salt enhances the flavor, while sugar adds a touch of sweetness.
Once you have these basic ingredients, you can start exploring different variations. Consider adding herbs, spices, or even cheese to your bread dough for extra flavor. You could also experiment with different grains, such as rye or cornmeal, to create unique and delicious loaves. The key is to have fun and be creative in the kitchen!
Mixing the Dough
Now it’s time to dive into the crucial step of mixing the dough for your delicious bread. The way you mix the dough plays a significant role in the final texture and taste of your bread.
By using different mixing techniques, such as the folding method or the rubbing-in method, you can achieve different results.
Additionally, paying attention to the consistency of the dough is essential. It should be elastic and slightly sticky, but not overly wet or dry.
Mixing Techniques
For a perfectly mixed dough, incorporate the ingredients using precise movements that ensure optimal distribution and a consistent texture.
To start, whisk the eggs in a separate bowl until they’re well beaten and frothy. This will help to incorporate air into the dough, giving it a lighter texture.
Next, slowly add the eggs to the dry ingredients, using a folding motion. This gentle technique prevents overmixing and keeps the dough from becoming tough.
Fold the ingredients together until just combined, being careful not to overwork the dough. Overmixing can lead to a dense and heavy final product.
By whisking the eggs and folding the ingredients, you’ll achieve a well-mixed dough that bakes up beautifully.
Enjoy the freedom to create delicious Señorita Bread!
Dough Consistency
Achieving the perfect dough consistency is crucial in creating a well-mixed dough that bakes up beautifully, ensuring optimal distribution of ingredients and a consistent texture for your Miss Bread recipe.
To achieve the desired dough consistency, consider the following tips:
- Different types of bread require different dough consistencies. For example, a soft and fluffy bread may require a wetter dough, while a denser bread may require a drier dough.
- Start with the recommended amount of liquid and gradually add more if needed. This allows you to have better control over the dough’s consistency.
- If the dough is too sticky, add a little more flour. On the other hand, if the dough is too dry, add a small amount of liquid.
- Knead the dough for the recommended amount of time to develop the gluten and achieve the desired texture.
- If you encounter issues with the dough consistency, troubleshoot by adjusting the liquid or flour amounts gradually until you reach the desired consistency.
Kneading and Shaping
To achieve perfectly shaped bread, master the art of kneading. Kneading is a crucial step in bread-making that helps develop gluten, giving the bread its structure and texture. There are various kneading techniques that you can use, depending on the recipe and your preference. One popular technique is the ‘fold and push’ method, where you fold the dough in half and then push it away from you with the heel of your hands. Repeat this motion, rotating the dough as you go, until it becomes smooth and elastic.
As you knead, pay attention to the dough’s consistency. It should be slightly tacky but not too sticky. If it’s too dry, add a little more water; if it’s too wet, sprinkle in some flour. This balance will ensure that the dough is easy to handle and shape.
When it comes to shaping the dough, there are a few tips to keep in mind. Start by gently patting the dough into a rectangle. Then, fold the dough in thirds, like a letter. Roll it up tightly, starting from one end, and seal the seam by pinching it together. Place the shaped dough seam-side down on a baking sheet or in a loaf pan, cover it, and let it rise until doubled in size.
Proofing the Dough
Now it’s time to let the dough proof and rise to perfection. The proofing process is crucial for developing the flavor and texture of the bread.
You’ll want to find a warm spot, around 75-85°F, where the dough can rest undisturbed.
Keep an eye out for the telltale signs of successful proofing, like a doubled in size dough and a gentle poke that leaves an indentation.
Time for Proofing
You can enhance the flavor and texture of your bread by allowing the dough to undergo the essential process of proofing. This is the time when the yeast activates and releases carbon dioxide, causing the dough to rise and develop its characteristic taste and texture.
Here are five key points to consider during the proofing process:
- Proofing time: The length of time you allow the dough to proof will depend on the recipe and ambient temperature. It can range from 30 minutes to several hours.
- Yeast activation: During proofing, the yeast feeds on sugars in the dough, producing carbon dioxide and alcohol. This fermentation process gives the bread its airy structure and distinct flavors.
- Temperature control: To ensure a successful proofing, maintaining a warm and draft-free environment is crucial. This can be achieved by placing the dough in a lightly greased bowl and covering it with a clean towel.
- Dough expansion: As proofing progresses, the dough will gradually increase in size, doubling or even tripling its original volume. This is a sign that the yeast is actively working.
- Visual cues: While proofing time is important, visual cues such as the dough doubling in size or passing the finger dent test are also reliable indicators that the proofing process is complete.
Ideal Temperature Conditions
Maintaining the ideal temperature conditions during the proofing process is crucial for achieving a perfectly risen and flavorful loaf of bread. Temperature control is key to activating the yeast and allowing it to work its magic.
Yeast is a living organism, and it thrives in warm environments. The ideal temperature range for proofing bread is between 75°F and 85°F (24°C and 29°C). This temperature range allows the yeast to ferment the dough, producing carbon dioxide gas that gives the bread its light and airy texture.
If the temperature is too low, the yeast will become sluggish and the bread won’t rise properly. On the other hand, if the temperature is too high, the yeast will become too active, resulting in a dense and overproofed loaf.
To ensure consistent temperature control, you can use a proofing box or place the dough in a warm spot in your kitchen, away from drafts. By maintaining the ideal temperature conditions, you’ll be on your way to baking a delicious loaf of bread.

Signs of Successful Proofing
To determine if your dough has successfully proofed, there are several indicators you can look for that will demonstrate the progress of fermentation.
Here are some key indicators and visual cues to help you determine if your dough is ready:
- Increased volume: When the dough has proofed successfully, it should visibly increase in size. You’ll notice that the dough has doubled or even tripled in volume.
- Dome-shaped top: A properly proofed dough will have a rounded, dome-shaped top. This indicates that the yeast has been activated and is producing carbon dioxide, causing the dough to rise evenly.
- Finger test: Gently press your finger into the dough. If the indentation remains without springing back, it means the dough is ready for baking.
- Bubbles: When you observe small air bubbles on the surface of the dough, it’s a sign that the yeast has been active and fermentation is taking place.
- Aromatic smell: A pleasant, yeasty aroma is a good indication that the dough has successfully proofed and is ready to be baked.
Baking Instructions
For perfect results, follow these detailed baking instructions for the Miss Bread recipe. Before you begin, make sure you have all the necessary ingredients and equipment ready. Preheat your oven to 375°F (190°C) and prepare a baking sheet lined with parchment paper.
Next, let’s take a look at the baking tips and troubleshooting table below to ensure you have a smooth baking experience:
| Baking Tips | Troubleshooting | Recommended Action |
|---|---|---|
| Use room temperature ingredients | Bread doesn’t rise properly | Check yeast freshness and proofing process |
| Knead the dough thoroughly | Bread is too dense | Allow dough to rise longer or adjust oven temperature |
| Allow dough to proof in a warm area | Bread has a gummy texture | Increase baking time or adjust oven temperature |
Now, let’s move on to the baking instructions. First, shape the dough into the desired form, whether it’s a loaf, buns, or any other shape you prefer. Place the shaped dough onto the prepared baking sheet, leaving enough space between each piece for expansion.
Next, cover the dough with a clean kitchen towel and let it rise in a warm area for about 30 minutes or until doubled in size. Once the dough has risen, carefully place the baking sheet in the preheated oven.
Bake for approximately 20-25 minutes or until the bread is golden brown and sounds hollow when tapped on the bottom. Remove from the oven and let it cool on a wire rack before enjoying your homemade Miss Bread.

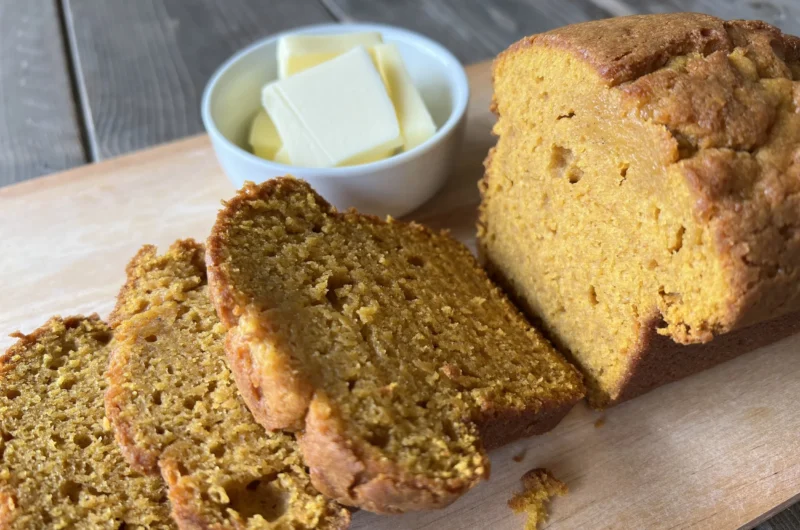
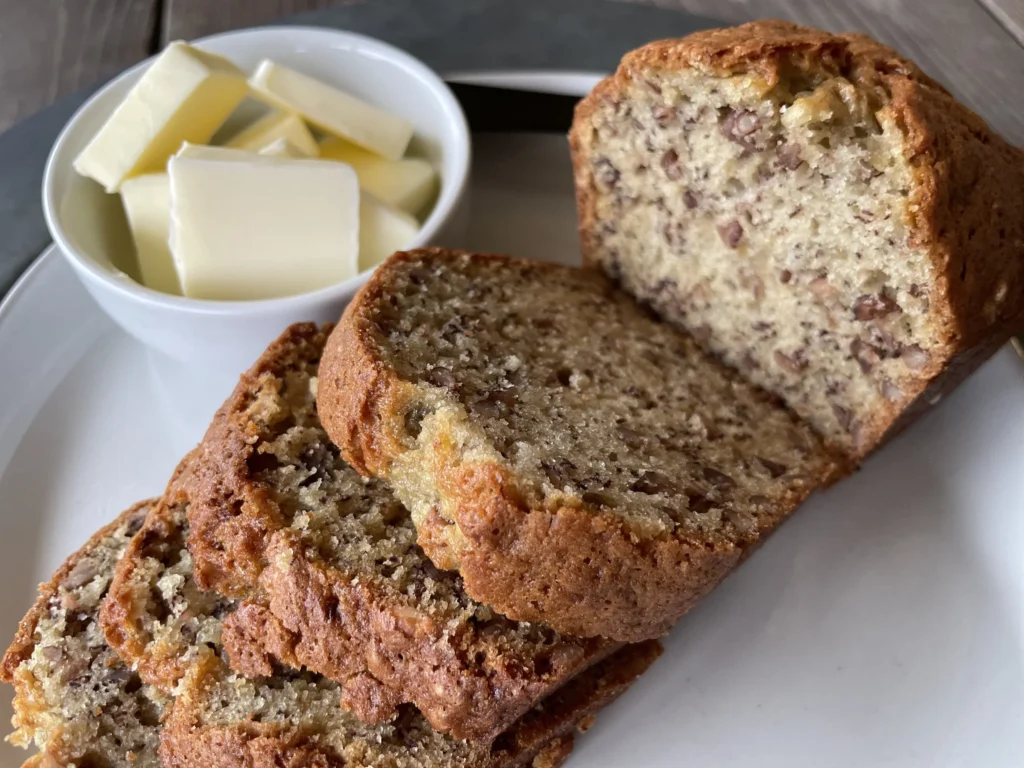
Miss Bread Recipe
Course: DessertCuisine: AmericanDifficulty: Easy10
servings20
minutes20
minutes300
kcalThis Miss Bread recipe is a delightful and straightforward option for breakfast, a quick snack, or even a sweet treat. With its American roots, banana bread has become a classic comfort food enjoyed by many. The recipe is relatively easy, making it suitable for both novice and experienced bakers. The combination of ripe bananas, butter, and simple pantry ingredients creates a moist and flavorful bread that can be customized with optional add-ins such as nuts or chocolate chips. Enjoy this delicious banana bread with a cup of coffee or as a satisfying snack any time of the day.
Ingredients
1/2 cup (1 stick) unsalted butter, melted
1 teaspoon baking soda
Pinch of salt
3/4 cup granulated sugar
1 large egg, beaten
1 teaspoon vanilla extract
1 1/2 cups all-purpose flour
1/2 to 1 cup chopped nuts (walnuts or pecans work well)
1/2 to 1 cup chocolate chips
Directions
- Preheat your oven to 350°F (175°C). Grease a 4x8 inch loaf pan.
- Stir the melted butter into the mashed bananas.
- Mix in the baking soda and salt.
- Add the sugar, beaten egg, and vanilla extract, and mix well.
- Stir in the flour until just incorporated. If you're adding nuts or chocolate chips, fold them into the batter.
- Pour the batter into the prepared loaf pan.
- Bake in the preheated oven for 60-65 minutes or until a toothpick inserted into the center comes out clean.
- Allow the banana bread to cool in the pan for about 10 minutes, then transfer it to a wire rack to cool completely.
- Once cooled, slice and enjoy!
Enjoying Your Homemade Bread
After savoring the aroma of your freshly baked Miss Bread, it’s time to explore the delightful ways you can enjoy your homemade creation. Here are some tips to enhance your bread-eating experience and a few variations you can try:
- Toast it: Slice your Miss Bread and pop it in the toaster for a warm and crispy treat. Spread some butter or your favorite jam for added flavor.
- Make sandwiches: Miss Bread is perfect for sandwiches. Layer your favorite fillings like ham, cheese, and fresh vegetables between two slices for a delicious and satisfying meal.
- French toast: Turn your Miss Bread into a decadent breakfast by making French toast. Dip thick slices of bread into a mixture of beaten eggs, milk, and vanilla extract, then fry them until golden brown. Serve with maple syrup and fresh fruit.
- Croutons: Cut your Miss Bread into cubes and bake them until crispy. Use these homemade croutons to top salads or soups for an extra crunch.
- Bread pudding: Don’t let any leftovers go to waste! Transform stale Miss Bread into a rich and comforting dessert by making a bread pudding. Combine bread cubes with a custard mixture of eggs, milk, sugar, and spices, then bake until golden and set.
Experiment with different baking tips, such as adding herbs or cheese to the dough, or shaping the bread into rolls or a loaf. The possibilities are endless when it comes to enjoying your homemade Miss Bread.
Nutrition facts
- Calories: Approximately 200-250 calories per slice
- Protein: About 3-4 grams
- Fat: Around 8-10 grams
- Carbohydrates: Approximately 30-35 grams
- Sugar: About 15-20 grams
- Fiber: Around 1-2 grams
Frequently Asked Questions
Can I Substitute Any of the Ingredients in the Señorita Bread Recipe?
You can substitute ingredients in the señorita bread recipe, but be careful not to make common mistakes. Make sure to choose substitutes that have similar properties and flavors to maintain the integrity of the dish.
How Long Does It Typically Take for the Dough to Rise During the Proofing Process?
During the proofing process, the dough typically takes around 1 to 2 hours to rise. However, the time can be affected by humidity. If the humidity is high, the dough may rise faster. Common mistakes that can prevent proper rising include using expired yeast or not giving the dough enough time to rise.
Can I Freeze the Dough and Bake It Later?
Yes, you can freeze the dough and bake it later. To shape the dough for Señorita Bread, gently roll it into a log and cut into desired portions. For a crispy crust, brush the dough with egg wash before baking. Enjoy the freedom of baking whenever you want!
What Can I Do if the Dough Is Too Sticky During the Kneading Process?
If the dough is too sticky during kneading, you can add a little more flour to the surface and your hands to prevent sticking. Gently knead until the dough becomes smooth and elastic.
How Should I Store the Baked Señorita Bread to Keep It Fresh for Longer?
To keep your baked señorita bread fresh for longer, there are a few storage options. You can wrap it tightly in plastic wrap or store it in an airtight container. Another option is to freeze it, which will help maintain its freshness even longer.


Can I Use Cherry Bread Recipe to Make Miss Bread?
Yes, you can definitely use a delicious cherry bread recipe to make miss bread. Just follow the recipe as is, and you’ll have a sweet and fruity miss bread with a delightful cherry flavor. Enjoy experimenting with this versatile recipe!
Conclusion
After following the recipe and putting in the effort to knead and shape the dough, you’re rewarded with a delicious homemade bread. The aroma fills your kitchen, transporting you to a place of warmth and comfort.
As you take a bite, the soft texture and the subtle flavors dance on your taste buds, bringing a sense of satisfaction and fulfillment.
This simple act of baking bread reminds us of the joy and contentment that can be found in the small things in life.