

Are you hesitant to try making your own Marble Rye Bread Recipe because you think it might be too complicated? Well, fear not! With this straightforward recipe, you’ll be able to create a beautiful loaf of marble rye bread that will impress your friends and family.
But that’s not all – this recipe also includes some tips and tricks to ensure your bake is a success. So grab your apron and get ready to embark on a delicious journey, where the perfect combination of flavors and swirls awaits you.
Get ready to elevate your bread-making skills to the next level!
Contents
- 1 Key Takeaways
- 2 Ingredients Needed for Marble Rye Bread
- 3 Step-By-Step Instructions for Preparing the Dough
- 4 How to Achieve the Perfect Rye Swirls
- 5 Baking and Shaping the Marble Rye Bread
- 6 marble rye bread recipe
- 7 Tips and Tricks for Ensuring a Successful Bake
- 8 Serving Suggestions and Storage Recommendations
- 9 Frequently Asked Questions
- 10 Conclusion-Marble Rye Bread Recipe
Key Takeaways
- Marble rye bread is a delicious and impressive bread to make at home, known for its beautiful swirls and combination of flavors.
- Rye bread is a whole grain bread that offers both delicious flavors and nutritional benefits, containing fiber, magnesium, phosphorus, and B vitamins.
- Making marble rye bread at home allows for customization of flavors and ingredients, such as adding caraway seeds, honey, or molasses for added flavor.
- Proper dough preparation, rising, swirling, shaping, and baking techniques are essential for achieving a successful and flavorful marble rye bread.
Ingredients Needed for Marble Rye Bread
To make delicious Marble Rye Bread, you’ll need a handful of essential ingredients that will come together to create the perfect blend of flavors and textures. Rye bread is known for its distinct taste and hearty texture, making it a popular choice for sandwiches and toast. There are several variations of rye bread, each with their own unique characteristics. Some include the addition of caraway seeds for a subtle, earthy flavor, while others incorporate ingredients like honey or molasses for a touch of sweetness.
When it comes to the health benefits of rye bread, there are plenty to consider. Rye is a whole grain, which means it contains all parts of the grain, including the bran, germ, and endosperm. This makes rye bread a good source of fiber and nutrients, such as magnesium, phosphorus, and B vitamins. Additionally, the high fiber content of rye bread can help regulate blood sugar levels, promote healthy digestion, and support weight management.
Whether you’re looking for a traditional rye bread or a unique variation, incorporating rye into your diet can offer both delicious flavors and nutritional benefits. So gather your ingredients and get ready to create a delectable loaf of Marble Rye Bread that will satisfy your taste buds and nourish your body.


Step-By-Step Instructions for Preparing the Dough
Now that you have gathered all the necessary ingredients, it’s time to start preparing the dough for your delicious marble rye bread.
The first step is to mix the ingredients together, ensuring that everything is well incorporated.
Once the dough is mixed, you’ll need to knead it until it becomes smooth and elastic.
Mixing the Ingredients
Start by combining the dry ingredients in a large mixing bowl. Measure out 3 cups of all-purpose flour, 1 tablespoon of cocoa powder, 1 teaspoon of instant yeast, and 1 ½ teaspoons of salt. Whisk them together until well combined. The cocoa powder adds a rich, dark color to the bread, giving it that distinctive marble look.
Now it’s time to tackle the wet ingredients. In a separate bowl, beat together 1 ¼ cups of warm water and 2 tablespoons of olive oil. Slowly pour the wet ingredients into the dry ingredients while stirring with a wooden spoon. Mix until the dough starts to come together, then switch to using your hands to knead the dough.
Kneading is an essential step in bread making. It helps develop the gluten, giving the bread its structure and texture. Troubleshooting common issues while kneading includes adding a little more flour if the dough is too sticky or a little more water if it’s too dry.
Once the dough is smooth and elastic, it’s time to let it rise.
Kneading the Dough
Begin by gently folding the dough over itself, using the palm of your hand. This helps to distribute the ingredients evenly and develop gluten, giving your bread a nice texture.
As you fold the dough, use a push-turn-fold motion, applying slight pressure with your palm. Repeat this process for about 10 minutes, until the dough becomes smooth and elastic.
If the dough feels sticky, lightly dust your work surface with flour to prevent sticking. Remember to avoid adding too much flour, as this can result in a dense loaf.
Troubleshooting kneading: If the dough tears easily, it may need more kneading. If it feels tight and resistant, let it rest for a few minutes before continuing.
Kneading techniques may vary, so trust your instincts and adjust as needed.
Allowing the Dough to Rise
With the dough properly kneaded, it’s time to let it rest and rise, allowing the flavors to develop and the yeast to do its magic. This step, known as the proofing process or dough fermentation, is crucial for achieving a light and airy texture in your marble rye bread.
After kneading the dough, place it in a large greased bowl and cover it with a clean kitchen towel or plastic wrap. Find a warm spot in your kitchen, free from drafts, and let the dough rise for about an hour or until it has doubled in size.
This process allows the yeast to feed on the sugars in the dough, releasing carbon dioxide, which creates air bubbles and gives the bread its soft and fluffy texture. So be patient, and let the dough work its magic during the proofing process.
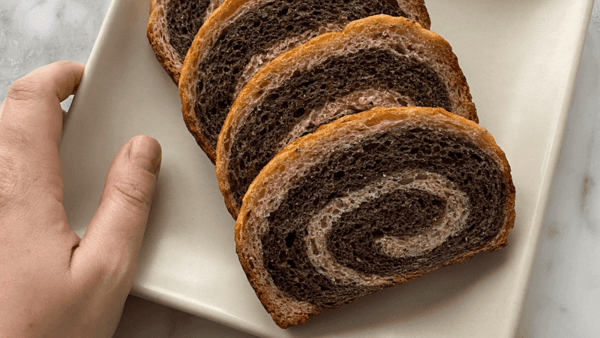
How to Achieve the Perfect Rye Swirls
To achieve the perfect rye swirls in your marble rye bread, you’ll need to master the art of swirling techniques and ensure even distribution.
Start by rolling out your light and dark rye dough into rectangular sheets of equal size.
Then, carefully layer the sheets on top of each other, making sure to align the edges before rolling them up tightly.
This will create beautiful, distinct swirls in your bread that will impress anyone who takes a bite.
Swirling Techniques
To achieve the perfect rye swirls in your marble rye bread, employ these expert swirling techniques that will elevate your baking to new levels of deliciousness.
Achieving beautiful swirl patterns in your bread requires precision and a touch of creativity. There are different types of swirl techniques that you can try to create stunning designs in your loaf.
One popular technique is the ‘S’ swirl, where you gently roll the dough into an ‘S’ shape before placing it in the loaf pan.
Another technique is the ‘Pinwheel’ swirl, where you roll two different colored doughs together and then slice the log to reveal the swirl pattern.
Don’t be afraid to experiment and create your own unique swirl techniques. With practice, you’ll master the art of swirling and create bread that not only tastes amazing but looks stunning too.
Achieving Even Distribution
To achieve evenly distributed swirls in your marble rye bread, utilize these expert techniques that will take your baking skills to new heights of perfection.
Achieving a marbled effect in your bread starts with proper shaping techniques. After dividing the dough into two equal portions, roll each portion into a rectangle shape. Place the light rye dough on top of the dark rye dough.
Starting from the shorter end, tightly roll the dough into a log, making sure to apply even pressure. Once the log is formed, gently stretch and twist it to create the marbled effect. Be careful not to overdo it, as you want distinct swirls without blending the colors too much.
With these shaping techniques, you’ll be able to achieve evenly distributed swirls in your marble rye bread.
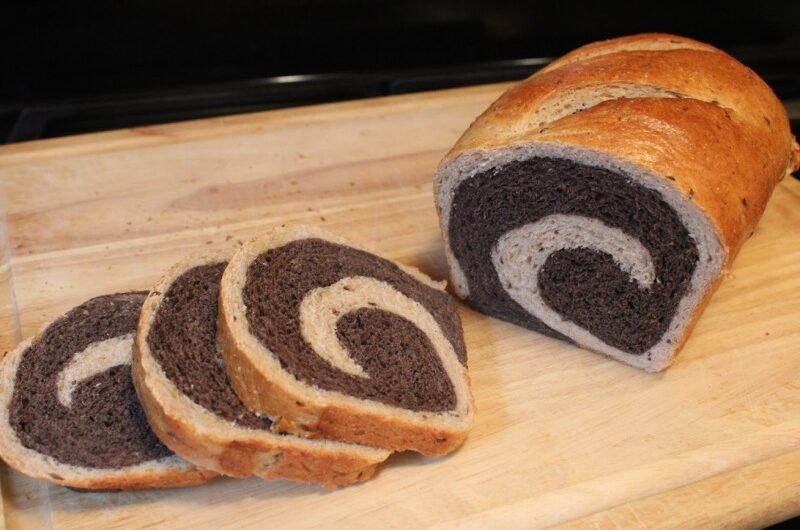
Baking and Shaping the Marble Rye Bread
For a beautifully shaped and perfectly baked Marble Rye Bread, follow these simple steps.
Baking and shaping the bread is the final step in this delicious journey.
Preheat your oven to 375°F (190°C).
Once your dough has risen, gently punch it down to release any air bubbles.
Divide the dough in half, keeping one portion slightly larger than the other.
Roll out the larger portion into a rectangle about ¼ inch thick.
Next, roll out the smaller portion into a similar-sized rectangle.
Place the smaller rectangle on top of the larger one and press lightly to adhere them together.
Starting from one end, tightly roll up the dough into a log.
Pinch the seams to seal.
Now, gently twist the log a few times to create the marbled effect.
Place the twisted dough into a greased bread pan, seam side down.
Cover and let it rise for another 30 minutes.
When ready, bake the bread in the preheated oven for 30-35 minutes, or until golden brown.
Remove from the oven and let it cool on a wire rack before slicing.
Troubleshooting common issues such as uneven baking or deflated bread can be avoided by following these baking techniques.
Enjoy the delicious homemade Marble Rye Bread!

marble rye bread recipe
Course: BreadCuisine: AmericanDifficulty: Intermediate1
servings2
hours45
minutes200
kcalMarble Rye Bread combines the flavors of light and dark rye for a visually stunning and flavorful loaf. With its marbled appearance and distinct taste, it's a delightful addition to any meal or enjoyed on its own.
Ingredients
2 cups bread flour
1 cup rye flour
1 tablespoon cocoa powder
1 tablespoon caraway seeds
1 tablespoon instant yeast
1 1/4 cups warm water
2 tablespoons molasses
2 tablespoons vegetable oil
1 teaspoon salt
Directions
- In a large bowl, combine bread flour, rye flour, cocoa powder, caraway seeds, and instant yeast.
- In a separate bowl, mix warm water, molasses, vegetable oil, and salt.
- Gradually add wet ingredients to the dry ingredients, stirring until a dough forms.
- Knead the dough on a floured surface for about 8-10 minutes until smooth and elastic.
- Place the dough in a greased bowl, cover with a clean towel, and let it rise in a warm place for about 1 hour or until doubled in size.
- Punch down the dough and divide it into two equal portions.
- Roll out each portion into a rectangle and stack one on top of the other.
- Roll the stacked dough into a log and place it in a greased loaf pan.
- Cover the pan with a towel and let it rise for another 30 minutes.
- Preheat the oven to 375°F (190°C).
- Bake the bread for 40-45 minutes or until golden brown and sounds hollow when tapped on the bottom.
- Allow the bread to cool before slicing and serving. Enjoy your homemade Marble Rye Bread!
Tips and Tricks for Ensuring a Successful Bake
For a successful bake of your Marble Rye Bread, here are some helpful tips and tricks to ensure delicious results every time.
To troubleshoot common baking issues, it’s important to understand the role of each ingredient. If your bread turns out too dense, it may be due to over-kneading the dough or using too much flour. To fix this, try kneading the dough for a shorter time and adjusting the amount of flour you use. If your bread doesn’t rise enough, check the expiration date of your yeast and make sure you’re proofing it properly. You can also try adding a pinch of sugar to help activate the yeast.
If you’re looking to add different flavors to your Marble Rye Bread, there are a few options to consider. One way is to incorporate different spices, such as caraway seeds or fennel seeds, into the dough. You can also experiment with adding ingredients like diced onions, garlic, or even cheese for a savory twist. For a touch of sweetness, try adding raisins or dried cranberries. Don’t be afraid to get creative and try out different combinations to find your favorite flavor profile.
Serving Suggestions and Storage Recommendations
If you’re wondering how to best serve your freshly baked Marble Rye Bread and how to store it properly, here are some helpful suggestions for you.
Serving suggestions:
- Toast it and slather it with creamy avocado for a delicious and nutritious breakfast.
- Make a classic Reuben sandwich by layering thinly sliced corned beef, sauerkraut, Swiss cheese, and Thousand Island dressing between two slices of Marble Rye Bread. Grill it to perfection and enjoy the melty goodness.
- Use it as a base for a savory bread pudding. Combine cooked bacon, sautéed onions, and shredded Gruyere cheese with a mixture of eggs and milk. Pour the mixture over cubed Marble Rye Bread and bake until golden and set.
Now that you know how to serve your Marble Rye Bread, let’s talk about storage tips.
To keep your bread fresh and delicious for as long as possible, follow these recommendations:
- Store it in a cool and dry place, such as a bread box or pantry, away from direct sunlight.
- If you won’t be consuming the bread within a few days, slice it and freeze the individual slices in an airtight container or freezer bag.
- When ready to enjoy, simply thaw the slices at room temperature or toast them to bring back that fresh-baked taste.
Frequently Asked Questions
Can I Use a Bread Machine to Make Marble Rye Bread?
Yes, you can use a bread machine to make marble rye bread. It’s a convenient way to simplify the baking process and still achieve delicious results. Enjoy the freedom of homemade bread!
How Long Does It Take for the Dough to Rise?
To achieve a light and fluffy texture, knead the dough properly. The rising time depends on various factors like room temperature, yeast activity, and dough consistency. Keep an eye on it and enjoy the process!
Can I Substitute the Rye Flour With Another Type of Flour?
Yes, you can substitute rye flour with another type of flour in your bread recipe. Consider the pros and cons of different flours for bread-making. Experiment and find the type that suits your taste and dietary needs. Enjoy the freedom to create!
Can I Freeze the Marble Rye Bread?
You’re wondering if you can freeze marble rye bread. Absolutely! Just make sure to wrap it tightly in plastic wrap and place it in a freezer bag. This will keep it fresh and delicious for when you’re ready to enjoy it again.
Can I Add Additional Ingredients Like Seeds or Spices to the Dough?
Yes, you can definitely add additional ingredients like seeds or spices to the dough! It’s a great way to experiment and create unique variations of marble rye bread. Get creative and enjoy the freedom of customizing your own delicious loaf.
Conclusion-Marble Rye Bread Recipe
In conclusion, making your own marble rye bread is a delicious and rewarding experience. By following the step-by-step instructions and applying the tips and tricks provided, you can achieve a beautiful loaf with perfect rye swirls.
Whether enjoyed fresh out of the oven or stored for later, this homemade bread will surely impress your family and friends. So why not give it a try and add a touch of bakery-quality to your homemade bread collection?