

To make Hardo Bread Recipe, start by activating yeast with warm water, sugar, and dry yeast. Add bread flour, salt, warm water, and vegetable oil. Combine all in a bowl, knead until smooth, and let it rise for an hour. Adjust consistency by adding flour gradually. Proof at room temperature and experiment with different times. Shape into a ball, score the top, and explore shaping techniques. Slice thick for chewiness. Experiment with crust preferences, toppings like butter, olive oil, jam, or honey. Follow these steps for a perfect Hardo bread. Your journey to mastering this delicious bread begins here.
Contents
Key Takeaways
- Activate yeast with warm water, sugar, and dry yeast for Hardo Bread.
- Knead dough until elastic and let it rise for an hour.
- Experiment with rising times for varied taste and texture.
- Shape dough, score the loaf, and experiment with crust preferences.
- Enjoy Hardo Bread with butter, olive oil, jam, or honey toppings.
Ingredients for Hardo Bread
To make delicious Hardo Bread, gather the following ingredients. Begin by activating the yeast. In a small bowl, mix 1 tablespoon of sugar with 1/4 cup of warm water (around 110°F) and sprinkle 1 packet of active dry yeast over the top. Let it sit for about 5-10 minutes until it becomes frothy.
Preheat your oven to 375°F (190°C) to guarantee it reaches the ideal baking temperature. While the yeast activates, prepare the other ingredients. You’ll need 4 cups of bread flour, 1 teaspoon of salt, 1 cup of warm water, and 2 tablespoons of vegetable oil.
Once the yeast is activated, combine it with the flour, salt, warm water, and vegetable oil in a mixing bowl. Knead the dough until it’s smooth and elastic. Cover the bowl with a damp cloth and let the dough rise in a warm place for about an hour.
Mixing and Kneading the Dough
To begin with, confirm your dough has the right consistency by gradually adding flour until it forms a smooth, elastic ball.
Next, master the proper kneading technique by folding the dough over and pushing with the heel of your hand.
Dough Consistency Check
Check the consistency of the dough by gently pressing it with your fingertips to confirm proper hydration and elasticity. In the initial visual inspection, the dough should appear smooth and slightly tacky but not overly sticky.
When performing the finger test, the dough should spring back slowly when poked, indicating good elasticity. If the dough feels too dry or crumbly, add a touch of water, a teaspoon at a time, and knead until it reaches the desired consistency.
Conversely, if the dough is too wet and sticks excessively to your fingers, incorporate a bit more flour gradually. Achieving the right balance between hydration and elasticity at this stage will set the foundation for a perfect Hardo bread texture.
Proper Kneading Technique
Engage your hands and wrist muscles to efficiently mix and knead the dough until it reaches a smooth and elastic consistency. Proper kneading is crucial to develop gluten, guaranteeing dough elasticity and proper flour hydration. When kneading, focus on hand technique to achieve the desired dough texture. Here’s a breakdown of the key elements to keep in mind during the kneading process:
| Key Element | Description | Importance |
|---|---|---|
| Dough Elasticity | Achieved through kneading | Ensures proper rise and texture |
| Flour Hydration | Even distribution of moisture in the dough | Affects the final bread texture |
| Hand Technique | Firm but gentle pressure and folding | Determines gluten development |
Time for Rising
When preparing the dough for hardo bread, make sure you allow sufficient time for it to rise after mixing and kneading to develop its flavor and texture.
Rising time variations can affect the final taste and structure of your bread. To achieve the perfect rise, consider factors like room temperature and the type of yeast used.
If you’re short on time, you can speed up proofing by placing the dough in a slightly warm oven or near a sunny window.
However, keep in mind that longer rise times often benefit the overall quality of the bread, allowing for a more developed flavor and better texture.
Experiment with different rising times to find what works best for your hardo bread recipe.
Proofing the Bread
To guarantee the best rise and development of flavors in your Hardo bread, allow it to undergo the proofing process at room temperature for the specified time. During this critical stage, the dough will ferment, enabling the yeast to activate fully and produce the desired texture and taste in your bread. Proper temperature control is essential here; a warm environment helps the yeast work its magic, but be cautious not to overheat, as this can kill the yeast and hinder the rising process.
To ensure successful proofing, cover the dough with a damp cloth or plastic wrap to retain moisture and prevent a dry crust from forming. This step is where the magic happens, as the dough will gradually increase in size, becoming airy and light. The rising process is fundamental in baking techniques, as it allows for the redistribution of gases, resulting in a fluffy interior and a crisp crust.
Paying attention to yeast activation and timing is key to achieving the perfect texture and flavor in your Hardo bread. Trust the process and be patient; your efforts will be rewarded with a delicious loaf.
Shaping and Scoring the Loaf
Shape the dough into a smooth ball by gently stretching and tucking it underneath.
Then, place the dough seam-side down on a floured surface to rest.
Before baking, use a sharp blade to score the loaf’s top with quick, decisive cuts to control expansion during baking.
Shape the Dough
Effortlessly mold the dough into a smooth and round shape, ensuring a consistent quality for excellent baking results.
When shaping the dough for your Hardo bread, explore various techniques for shaping to create unique and creative designs. Begin by gently stretching the dough into a rectangle, then folding it over itself in thirds, similar to folding a letter.
Next, roll the dough into a tight log, sealing the edges by pinching them together. For a traditional round loaf, tuck the edges underneath, rotating and shaping the dough to form a smooth ball. Experiment with different styles like braiding or knotting for a more decorative finish.
Score the Loaf
After shaping the dough for your Hardo bread, the next step is to carefully score the loaf before baking to control its expansion and create a visually appealing design on the crust. Bread scoring techniques play an essential role in not only controlling how the bread expands but also in enhancing its visual appeal. By using different scoring patterns, you can influence crust formation and create beautiful designs on the bread’s surface. Here are some common scoring patterns you can try for your Hardo bread:
| Scoring Pattern | Description |
|---|---|
| Single Slash | Simple, straight slash across the top of the loaf |
| Cross Slash | Two intersecting slashes creating a cross pattern |
| Tic-Tac-Toe Pattern | Multiple intersecting diagonal slashes |
| Leaf Pattern | Curved slashes resembling a leaf shape |
| Spiral Pattern | Circular pattern spiraling from the center outwards |
Baking the Hardo Bread
When preparing to bake the Hardo Bread, make sure your oven is preheated to the correct temperature. Preheat it to 450°F (230°C) to guarantee that the bread bakes evenly and achieves that perfect crispy crust and soft interior.
Once your oven is ready, carefully transfer the scored loaf onto a baking sheet lined with parchment paper. Place the baking sheet on the middle rack of the oven and bake the bread for about 25-30 minutes. Keep an eye on it, as baking times may vary depending on your oven. The bread is done when it turns golden brown and sounds hollow when tapped on the bottom.
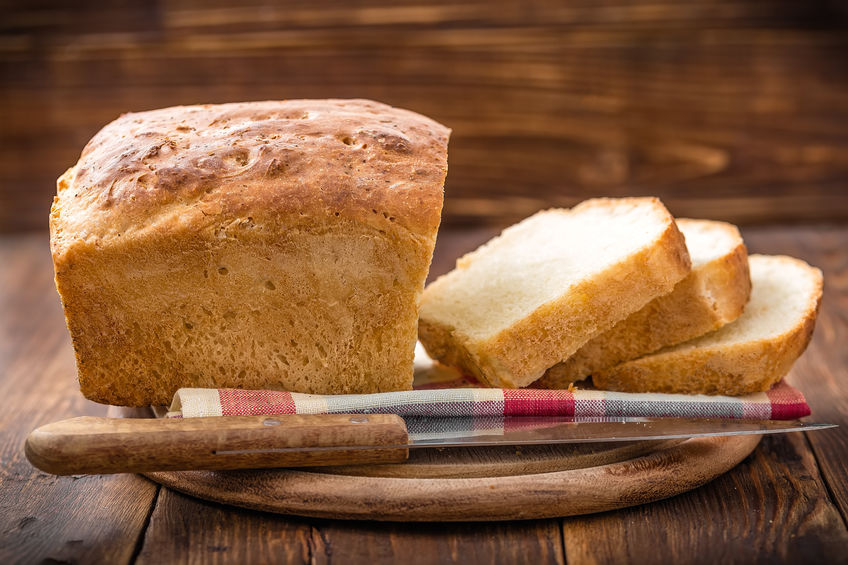
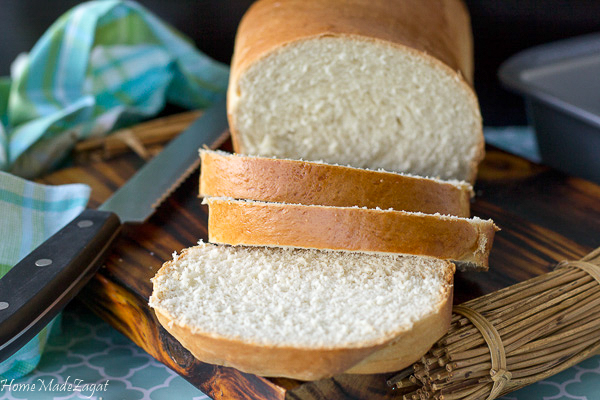
After baking, allow the Hardo Bread to cool on a wire rack before slicing. For the best slicing results, use a serrated bread knife to cut through the crispy crust without compressing the soft interior. Once sliced, store any leftovers in a paper bag at room temperature for up to two days, or freeze slices for longer shelf life. Enjoy your freshly baked Hardo Bread!
Hardo Bread Recipe
Course: Main courseCuisine: ItalianDifficulty: Intermediate1
servings20
minutes40
minutes150
kcalHardo bread, a traditional Italian delight, boasts a crunchy crust and a soft interior. This rustic loaf is crafted with simple ingredients and offers a delightful aroma that fills your kitchen. Perfect for pairing with soups or as a standalone snack.
Ingredients
3 cups bread flour
1 ½ teaspoons active dry yeast
1 ½ cups warm water
1 tablespoon olive oil
1 teaspoon salt
Directions
- In a bowl, dissolve yeast in warm water. Let it sit for 5 minutes until foamy.
- Add olive oil and salt to the yeast mixture, then gradually mix in the flour until a dough forms.
- Knead the dough on a floured surface for about 8-10 minutes until smooth and elastic.
- Place the dough in a greased bowl, cover with a damp cloth, and let it rise in a warm place for about 1 hour or until doubled in size.
- Preheat your oven to 400°F (200°C).
- Punch down the dough and shape it into a loaf. Place it on a baking sheet lined with parchment paper.
- Make slashes on the top of the loaf with a sharp knife.
- Let the loaf rise for another 30 minutes.
- Bake in the preheated oven for 35-40 minutes or until golden brown.
- Remove from the oven and let it cool on a wire rack before slicing and serving. Enjoy your homemade Hardo bread!
Serving and Enjoying!
To fully enjoy the freshly baked Hardo Bread, consider pairing it with a selection of savory spreads or cheeses to elevate its flavors. When it comes to serving and enjoying this hearty bread, here are some tips to make the experience even more delightful:
- Bread Slicing Techniques: For a rustic feel, try cutting the Hardo Bread into thick slices. This method allows you to appreciate the chewy texture and robust flavors of the bread.
- Crust Preferences: Whether you like a crunchy crust or a softer one, the Hardo Bread offers both. Experiment with different crust portions to find your perfect balance of texture.
- Butter vs Olive Oil Spread: Spread a generous layer of butter for a classic taste or drizzle some olive oil for a Mediterranean twist. Both options complement the Hardo Bread beautifully.
- Jam vs Honey Toppings: Sweeten your Hardo Bread with a dollop of jam for a fruity kick, or opt for a smear of honey for a natural sweetness. Each topping adds a unique dimension to the bread’s flavor profile. Enjoy exploring these delicious combinations!
Frequently Asked Questions
Can I Add Nuts or Seeds to the Hardo Bread Dough?
You can definitely add nuts or seeds to the hardo bread dough for flavorful additions. Baking experimentation allows for nutty variations or seed alternatives, enhancing taste and texture. Go ahead and get creative with your ingredients!
How Do I Store Hardo Bread to Keep It Fresh?
To keep your hardo bread fresh, store it in a cool, dry place. Use a bread box or airtight container. Avoid refrigeration as it can dry out the bread. Enjoy the bread within a few days for best freshness.
Can I Use Whole Wheat Flour Instead of All-Purpose?
Yes, you can use whole wheat flour as a baking substitution for all-purpose. It provides a nuttier flavor and extra fiber. For gluten-free alternatives, consider almond or coconut flour – they can yield different textures but work well in many recipes.
Is It Possible to Make Hardo Bread Without Yeast?
Making hardo bread without yeast is possible. Consider using baking powder or baking soda as alternatives. Experiment with different flours like spelt or oat. Incorporate acidic elements like yogurt for a tangy flavor. Happy baking!
Can I Freeze the Hardo Bread Dough for Later Use?
Yes, you can freeze the hardo bread dough for later use. This will allow you to prepare the dough in advance and bake it at a more convenient time. Freezing dough is a great way to streamline your baking process.
Conclusion-Hardo Bread Recipe
Now that you’ve mastered the art of making hardo bread, you’re officially the bread baking guru! Your friends and family will be in awe of your baking skills, and you’ll be the talk of the town.
So go ahead, bake up a storm and enjoy the delicious fruits of your labor. You’re now a bread-making legend!