

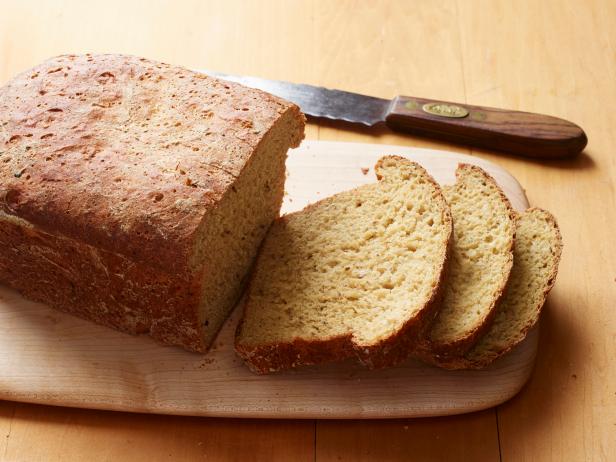
Imagine sinking your teeth into a warm loaf of dill bread Recipe, its fluffy texture melting in your mouth like a cloud. With its subtle yet unmistakable flavor, this bread is a delightful addition to any meal or a satisfying snack on its own.
But how can you recreate this mouthwatering treat in your own kitchen? Look no further, as we unveil the secrets to making the perfect dill bread.
From selecting the finest ingredients to mastering the art of shaping and proofing, we will guide you through each step of the process.
Get ready to elevate your baking skills and impress your loved ones with this delectable homemade creation.
Contents
- 1 Key Takeaways
- 2 Ingredients Needed for Dill Bread
- 3 Preparing the Dough for Dill Bread
- 4 Adding the Dill Flavor to the Bread Dough
- 5 Shaping and Proofing the Dill Bread
- 6 Baking the Dill Bread to Perfection
- 7 Dill Bread Recipe
- 8 Serving and Storing Your Homemade Dill Bread
- 9 Frequently Asked Questions
- 10 Conclusion-Dill Bread Recipe
Key Takeaways
- Dill bread variations offer customization options with ingredients like garlic, cheddar cheese, or sun-dried tomatoes.
- Dill not only adds flavor but also brings health benefits due to its richness in antioxidants and anti-inflammatory properties.
- Dill can be used in various forms such as dried dill, fresh dill, dill seed, or dill oil for seasoning.
- Proper dough consistency and the right balance of dill flavor are crucial for achieving a light and fluffy dill bread.
Ingredients Needed for Dill Bread
To prepare delicious Dill Bread, gather all the necessary ingredients for a flavorful and aromatic loaf. Dill bread variations offer a range of options, allowing you to customize your loaf to suit your taste preferences. The star ingredient, dill, not only adds a burst of flavor but also brings a host of health benefits.
Dill bread variations can include ingredients such as garlic, cheddar cheese, or even sun-dried tomatoes, adding extra layers of taste to your loaf. Experimenting with different combinations will allow you to create a bread that perfectly complements your meals or stands on its own as a delightful snack.
Apart from its delicious taste, dill also offers numerous health benefits. It’s rich in antioxidants, which can help protect your body against harmful free radicals. Dill is also known for its anti-inflammatory properties and may help alleviate symptoms of conditions such as arthritis. Additionally, it can aid digestion and prevent indigestion, making it a great addition to your diet.
Preparing the Dough for Dill Bread
Once you have gathered all the necessary ingredients for your flavorful and aromatic Dill Bread, it’s time to roll up your sleeves and dive into the exciting process of preparing the dough.
The dough consistency is crucial in ensuring a light and fluffy bread. Start by adding the warm water to a large mixing bowl and sprinkle the yeast over it. Let it sit for a few minutes until it becomes frothy. This indicates that the yeast is active and ready to work its magic.
Next, add the flour, sugar, salt, melted butter, and chopped dill to the bowl. Using a wooden spoon or your hands, mix everything together until a sticky dough forms. If the dough feels too dry, add a tablespoon of water at a time until it reaches the right consistency. On the other hand, if it feels too wet, add a little more flour and knead it in.
Now comes the fun part – kneading the dough. Turn the dough out onto a lightly floured surface and start kneading. Use the heel of your hand to push the dough away from you, then fold it back towards you. Repeat this motion, adding more flour if needed, until the dough becomes smooth and elastic. This process helps activate the gluten in the flour, resulting in a chewy and well-textured bread.
Adding the Dill Flavor to the Bread Dough
Now it’s time to infuse your bread dough with the delightful flavor of dill.
There are a few techniques you can use to achieve this.
One option is to steep fresh dill in warm water or milk and use the infused liquid in your dough.
Alternatively, you can add dried dill directly to the dough for a more concentrated flavor.
Whichever method you choose, it’s important to find the right balance of dill flavor to ensure your bread is deliciously seasoned without overpowering the other ingredients.
Dill Infusion Technique
To infuse the dill flavor into your bread dough, carefully chop fresh dill and add it directly into the mixture, ensuring each bite bursts with aromatic and tangy notes.
This dill infusion technique not only enhances the taste of your bread, but it also brings a host of health benefits. Dill is known for its antioxidant properties, which can help protect your body against free radicals and inflammation. It’s also a good source of vitamins A and C, as well as minerals like iron and calcium.
If you’re looking for alternative dill infusion methods, you can try steeping fresh dill in hot water and using the resulting dill-infused liquid in your dough. This method allows the flavor to fully permeate the bread, giving it a subtle yet delightful taste.
Dill Seasoning Options
Enhance the flavor of your bread dough by incorporating dill seasoning alternatives that will add a delightful and aromatic taste to every bite. Here are four options to consider:
- Dried Dill: Easily accessible and convenient, dried dill provides a concentrated flavor that blends well with the dough. It adds a subtle hint of dill without overpowering the other ingredients.
- Fresh Dill: For a more vibrant and intense flavor, use fresh dill. Chop it finely and mix it into the dough for a burst of freshness. The bright green color also adds visual appeal to your bread.
- Dill Seed: If you prefer a milder dill flavor, dill seeds are an excellent choice. These small seeds offer a slightly nutty taste and a gentle aroma that complements the bread’s texture.
- Dill Oil: For a quick and easy option, dill oil provides a concentrated dill flavor. Just a few drops are enough to infuse the dough with a distinct dill taste.
Not only do these dill seasoning alternatives enhance the flavor of your bread, but they also offer health benefits. Dill is rich in antioxidants, vitamins, and minerals, promoting digestion and boosting the immune system.
Balancing Dill Flavor
As you continue your culinary journey, let’s now explore the art of balancing dill flavor by incorporating it into your bread dough.
To achieve the perfect dill bread taste, it’s important to enhance the dill flavor without overwhelming the other ingredients.
Start by finely chopping fresh dill leaves, ensuring you have enough to impart a subtle yet distinct taste. Mix the chopped dill with the dry ingredients before adding the wet ingredients to evenly distribute the flavor throughout the dough.
You can also infuse the wet ingredients with dill by simmering them together for a few minutes, allowing the flavors to meld before incorporating them into the dough.
Shaping and Proofing the Dill Bread
Shape and proof the dill bread to achieve an irresistible combination of soft, fluffy interior and a perfectly golden crust. Here are some shaping techniques and proofing tips to help you create the perfect loaf:
- Start by gently punching down the dough after the first rise. This releases any built-up gases and helps redistribute the yeast, resulting in a more even texture.
- Divide the dough into equal portions and shape them into balls. To do this, lightly flour your hands and gently pull the edges of the dough towards the center, tucking them underneath. Roll the dough on the countertop in a circular motion until you have a smooth ball.
- Place the shaped dough onto a greased baking sheet or into a greased loaf pan. Make sure to leave enough space between the loaves to allow for expansion during the second rise.
- Cover the shaped dough with a clean kitchen towel or plastic wrap and let it rise for the second time. This is called proofing and can take anywhere from 30 minutes to an hour, depending on the temperature and humidity of your kitchen. The dough should double in size and feel soft and springy to the touch.
Baking the Dill Bread to Perfection
Now that your dill bread is shaped and proofed, it’s time to bake it to perfection.
Preheat your oven to the recommended temperature and place the bread in the center rack.
The baking time will depend on the size of your loaf, so keep a close eye on it to ensure a golden crust and a soft, flavorful interior.
Preparing the Dough
To achieve the perfect texture and flavor in your dill bread, you’ll want to begin by carefully preparing the dough. Here are four essential steps to ensure your dough turns out just right:
- Dough Consistency: Start by measuring your ingredients accurately. Too much flour can result in a dry, dense bread, while too little can make it too moist and sticky. Aim for a soft and slightly tacky dough that holds its shape.
- Kneading Techniques: Kneading is crucial to develop the gluten in the dough, which gives the bread its structure. Use the heel of your hand to push the dough away from you, then fold it back over itself. Repeat this process, turning the dough as you go, until it becomes smooth and elastic.
- Resting Period: After kneading, allow the dough to rest for about 10 minutes. This relaxes the gluten and makes it easier to shape and handle.
- Proper Proofing: Once the dough is shaped, let it rise in a warm, draft-free area until it doubles in size. This can take anywhere from 1 to 2 hours, depending on the temperature of your kitchen.
Adding the Dill
To infuse your dill bread with a burst of flavor, it’s time to add the star ingredient – dill! The vibrant green color and unique aroma of dill will take your bread to a whole new level.
There are various dill infusion techniques you can employ to enhance the dill flavor in your bread. One popular method is to finely chop fresh dill and incorporate it into the dough during the mixing process. This ensures that every bite of bread is packed with the refreshing taste of dill.
Another technique is to create a dill-infused oil by steeping dill leaves in warm oil for a few hours. Brushing this oil over the bread before baking will give it a beautiful dill essence that permeates every slice.
Whichever method you choose, remember to be generous with the dill, as its distinctive flavor is what makes this bread truly special.
Baking Time and Temperature
To ensure your dill bread is baked to perfection, you need to pay close attention to the time and temperature in order to achieve a golden crust and a soft, flavorful interior. Here are some baking techniques to help you experiment with flavors:
- Preheat your oven: Before placing your dill bread in the oven, make sure to preheat it to the specified temperature. This ensures that the bread bakes evenly and rises properly.
- Bake until golden brown: Keep an eye on the bread while it bakes. The crust should turn a beautiful golden brown color, indicating that it’s fully cooked. However, be careful not to overbake it, as this can result in a dry and tough loaf.
- Use a thermometer: To ensure the bread is cooked through, insert a thermometer into the center. The internal temperature should reach around 190°F (88°C) for a perfectly baked dill bread.
- Let it cool: Once the bread is baked, resist the temptation to cut into it right away. Allow it to cool completely on a wire rack before slicing. This will help the flavors develop and the bread to become moist and tender.
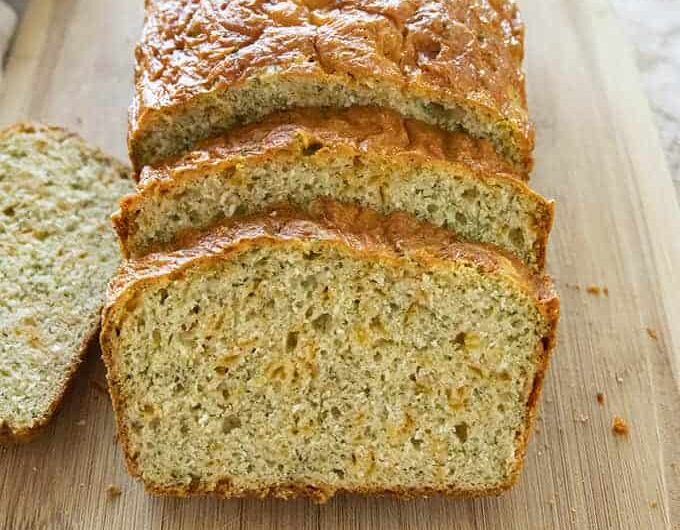
Dill Bread Recipe
Course: BakingCuisine: AmericanDifficulty: Intermediate8
servings15
minutes40
minutes200
kcalEnjoy the delightful flavors of dill in this savory bread recipe. Perfect for any occasion, this bread pairs wonderfully with soups or salads, or simply enjoy it on its own as a tasty snack.
Ingredients
2 cups all-purpose flour
1 tablespoon baking powder
1 teaspoon salt
1 tablespoon sugar
1 tablespoon dried dill
1 cup milk
1/4 cup vegetable oil
1 egg, beaten
1/4 cup chopped fresh dill (optional)
Directions
- Preheat your oven to 375°F (190°C) and grease a loaf pan.
- In a large bowl, combine the flour, baking powder, salt, sugar, and dried dill.
- In another bowl, mix together the milk, vegetable oil, and beaten egg.
- Gradually add the wet ingredients to the dry ingredients, stirring until just combined. Be careful not to overmix.
- If using fresh dill, fold it into the batter.
- Pour the batter into the prepared loaf pan and spread it evenly.
- Bake for 35-40 minutes, or until a toothpick inserted into the center comes out clean.
- Allow the bread to cool in the pan for a few minutes before transferring it to a wire rack to cool completely.
- Slice and serve your delicious dill bread, and enjoy!
Serving and Storing Your Homemade Dill Bread
Enhance your dill bread experience by following these simple tips for serving and storing your homemade creation. Once your dill bread is baked to perfection, it’s time to indulge in its delightful flavors. Here are some serving suggestions to make the most of your dill bread:
- Freshly Sliced: Enjoy a warm slice of dill bread straight from the oven. The aroma of dill and the soft texture of the bread will tantalize your taste buds.
- Toasted: For a crispy twist, toast your dill bread and spread some creamy butter or cream cheese. The toasting process enhances the flavors and gives the bread a satisfying crunch.
- Sandwiches: Use your dill bread as a base for delicious sandwiches. It pairs perfectly with smoked salmon, cucumber, or roasted turkey, adding a zesty kick to each bite.
Now that you’ve enjoyed your dill bread, it’s important to store it properly to maintain its freshness. Here are the best storage methods for your homemade dill bread:
| Method | Description |
|---|---|
| Room Temperature | Keep your dill bread in an airtight container at room temperature for up to 2 days. After that, it’s best to move it to the refrigerator. |
| Refrigerator | To extend the shelf life of your dill bread, store it in the refrigerator for up to a week. Make sure to wrap it tightly in plastic wrap or place it in a sealed bag. |
| Freezer | If you want to keep your dill bread for longer, freeze it. Wrap individual slices or the whole loaf tightly in plastic wrap and place it in a freezer-safe bag. It can be stored for up to 3 months. Remember to thaw it at room temperature before enjoying. |
Frequently Asked Questions
Can I Substitute Dried Dill for Fresh Dill in This Recipe?
You can definitely use dried dill instead of fresh in this recipe. While fresh dill has a brighter flavor and softer texture, dried dill still adds a delicious herby taste to your dill bread.
How Long Does It Take for the Bread Dough to Rise?
You’ll be delighted when you see your bread dough rising to perfection. Depending on the recipe and room temperature, it usually takes about 1-2 hours for the dough to rise. Enjoy the process!
Can I Freeze the Dill Bread Dough for Later Use?
Yes, you can freeze the dill bread dough for later use. Freezing bread dough is a convenient way to store it and have fresh bread whenever you want. Simply wrap the dough tightly in plastic wrap and place it in the freezer.
Can I Add Other Herbs or Spices to the Dill Bread Dough?
You can definitely get creative with the flavor combinations in your dill bread dough! Add your favorite herbs and spices to give it a unique twist. Recommended options include garlic, rosemary, and thyme. Let your taste buds soar!
How Long Does the Dill Bread Stay Fresh After Baking?
To keep your dill bread fresh, store it in an airtight container or wrap it tightly in plastic wrap. It should stay fresh for about 3-4 days. You can also add cheese to the dill bread dough for extra flavor.
Conclusion-Dill Bread Recipe
In just a few simple steps, you can create a heavenly loaf of dill bread that will leave your taste buds dancing with delight.
The fragrant aroma of fresh dill will fill your kitchen as the bread bakes to a golden perfection.
Whether you enjoy it warm from the oven or toasted with a smear of butter, this homemade dill bread is sure to become a staple in your kitchen.
So go ahead, unleash your inner baker and savor the magic of dill-infused goodness.