

Create irresistible Ciabatta Bread Rolls Recipe using high-quality flour, water, yeast, salt, and olive oil. Blend yeasty water mixture in a mixing bowl, then knead the dough with a wooden spoon. Oil the bowl, place the dough inside, cover, and let it proof in a warm area. Handle the dough with an artisanal touch to shape and allow to rest. Pay attention to proofing techniques for the final stage, experimenting with quick or slow fermentation. Preheat the oven, consider a baking stone, and get creative with presentation. Serve with cheese or charcuterie for a delightful treat. Master the art of ciabatta bread rolls effortlessly.
Contents
Key Takeaways
- Use high-quality flour, yeast, water, salt, and olive oil for authentic ciabatta taste.
- Master dough mixing and proofing techniques for light and airy rolls.
- Experiment with proofing methods for optimal texture and flavor.
- Consider baking tips like preheating oven and using baking stone.
- Serve creatively with cheese, charcuterie, and visually appealing presentation.
Ingredients Needed
To craft the perfect Ciabatta Bread Rolls, make sure you have high-quality flour, water, yeast, salt, and olive oil at the ready.
Flour forms the foundation of your Ciabatta Bread Rolls, providing structure and texture. Opt for a good quality flour to guarantee the best results.
Water, the essence of life, is vital in activating the yeast and forming gluten strands that give the rolls their signature airy texture. When combined with yeast, a living organism that leavens the dough by producing carbon dioxide gas, your rolls will rise beautifully.
Salt not only enhances the flavor but also regulates the fermentation process, ensuring a well-balanced taste.
Lastly, a touch of olive oil adds richness and helps in achieving that desirable crust. By carefully selecting and measuring these ingredients, you set the stage for a delightful baking experience that will yield delectable Ciabatta Bread Rolls.
Mixing the Dough
Prepare your mixing bowl by ensuring it’s clean and dry before starting to combine the flour, water, yeast, salt, and olive oil for the Ciabatta Bread Rolls. Begin by mixing the dry ingredients – flour and salt – in the bowl. Then, in a separate container, blend warm water with yeast until dissolved. Now, add the yeasty water mixture and olive oil to the dry ingredients. Use a wooden spoon to combine the ingredients until a sticky dough forms.
Once the initial mixing is done, it’s time to begin the kneading process. Sprinkle some flour on a clean surface and transfer the dough onto it. Knead the dough by stretching it away from you, then folding it back over itself. Repeat this motion for about 10-15 minutes until the dough becomes smooth and elastic.
After kneading, place the dough back into the mixing bowl. Cover it with a damp cloth and let it rest in a warm, draft-free area for about 1.5 to 2 hours or until it has doubled in size. This essential rising time is important for developing the flavors and textures of your Ciabatta Bread Rolls.
First Round of Proofing
After kneading the dough to a smooth and elastic consistency, the next step in perfecting your Ciabatta Bread Rolls is moving on to the first round of proofing. This essential stage allows for the yeast activation and dough rising, ensuring that your rolls will have the perfect texture and flavor.
To begin, lightly oil a bowl to prevent the dough from sticking during the rising process. Place the dough ball into the bowl and cover it with a damp kitchen towel or plastic wrap. Set the bowl in a warm, draft-free area to facilitate the yeast activation. This warm environment encourages the yeast to feed on the sugars in the dough, producing carbon dioxide bubbles that make the dough rise.
Allow the dough to proof for about 1 to 1.5 hours, or until it has doubled in size. This timeframe may vary depending on the room temperature and the yeast used. Once the dough has risen adequately, it’s ready to move on to the next step of shaping the rolls.
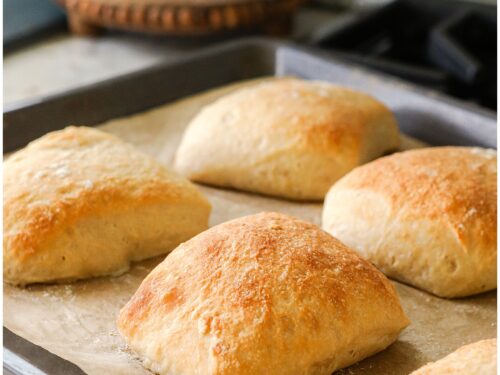
Shaping the Rolls
When shaping the Ciabatta Bread Rolls, pay attention to creating uniform sizes to guarantee even baking and a professional presentation. Start by gently dividing the dough into equal portions using a bench scraper for precise cuts.
To achieve perfectly shaped rolls, work swiftly but delicately, handling the dough with an artisanal touch. Take each portion and gently pull the edges towards the center, tucking them underneath to create a taut surface. This technique helps to build structure and maintain a consistent shape during baking.
As you shape each roll, place them seam side down on a parchment-lined baking sheet, leaving enough space between them to expand. Remember, the key to a uniform appearance lies in the details of shaping. Applying even pressure and shaping with care will result in a professional-looking batch of Ciabatta Bread Rolls.
Once shaped, allow the rolls to rest briefly before moving on to the next step of the bread-making process.
Final Proofing Stage
During the final proofing stage of your ciabatta bread rolls, it’s essential to pay attention to proofing techniques and create ideal proofing conditions for the best results.
Make sure that your dough is proofed in a warm, draft-free environment to encourage proper fermentation and rise.
Following these steps will help you achieve the desired texture and flavor in your finished ciabatta bread rolls.
Proofing Techniques Explained
Wondering how to perfect the final proofing stage of your ciabatta bread rolls?
When it comes to proofing techniques, you have two main options: quick proofing or slow fermentation. Quick proofing involves using a warm environment to speed up the rising process, ideal for when you’re short on time.
On the other hand, slow fermentation allows for a longer rise at cooler temperatures, developing deeper flavors in your dough.
For the final proofing of your ciabatta bread rolls, consider the texture and flavor you desire, as well as the time you have available. Experiment with both techniques to find what works best for your schedule and taste preferences.
Enjoy the freedom to craft your perfect ciabatta bread rolls through thoughtful proofing techniques.
Ideal Proofing Conditions
To achieve the ideal proofing conditions for your ciabatta bread rolls’ final proofing stage, focus on controlling temperature and humidity levels to guarantee a perfect rise. Proper temperature control is essential, as it affects the yeast activity and dough fermentation. Aim for around 75-80°F (24-27°C) for the best proofing. Additionally, maintaining adequate humidity levels prevents the dough’s surface from drying out, promoting a better rise and a crispy crust. Here’s a table summarizing the key points for creating the perfect proofing environment:
| Aspect | Ideal Condition |
|---|---|
| Temperature | 75-80°F (24-27°C) |
| Humidity Levels | Adequate moisture |
| Time Management | Monitor rise closely |
Baking and Serving
Now that your ciabatta bread rolls are perfectly proofed, it’s time to focus on the essential baking stage. Make sure your oven is preheated to the right temperature and consider utilizing a baking stone for that perfect crust.
When serving, think about creative presentation ideas and how to best complement these delicious rolls with various dishes.
Baking Tips
For best results when baking ciabatta bread rolls, make sure you preheat the oven to the specified temperature and use a baking stone or sheet to achieve a crisp crust.
To guarantee your ciabatta bread rolls turn out perfectly, here are some essential baking tips:
- Oven Temperature: Always follow the recipe’s oven temperature settings for the perfect bake.
- Rising Time: Allow the dough to rise sufficiently to achieve the desired light and airy texture.
- Baking Techniques: Use steam in the oven during the initial baking stage to create a crispy crust.
Ciabatta Bread Rolls Recipe
Course: BreadCuisine: ItalianDifficulty: Intermediate8
servings20
minutes25
minutes180
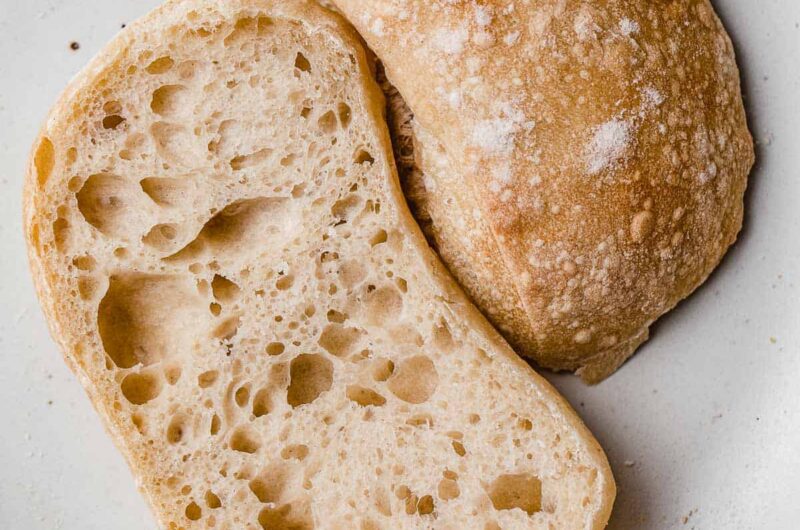
kcalLearn to make authentic Ciabatta Bread Rolls with this recipe. These Italian-style rolls boast a crisp crust and airy interior. Perfect for sandwiches or dipping into soups and sauces.
Ingredients
500g bread flour
10g salt
7g instant yeast
400ml lukewarm water
Olive oil
Directions
- In a large bowl, mix flour, salt, and yeast.
- Gradually add water, stirring until a sticky dough forms.
- Cover and let rise for 1-2 hours.
- Divide dough into 8 portions, shape into rolls, and place on a floured surface.
- Preheat oven to 220°C and let rolls rise for 30 minutes.
- Brush rolls with olive oil and bake for 20-25 minutes until golden.
- Cool on a wire rack before serving. Enjoy!
Serving Suggestions
Wondering how to elevate the presentation of your freshly baked ciabatta bread rolls for serving? To enhance the flavors of your ciabatta bread rolls, consider some delicious flavor pairings. Serve them with a selection of cheeses like Parmesan, Gouda, or Brie for a delightful combination. Alternatively, pair them with charcuterie meats such as prosciutto, salami, or chorizo for a savory twist.
When it comes to plating techniques, opt for a rustic wooden board for a homely feel, or a sleek slate platter for a more modern presentation. Arrange the rolls artfully with the accompaniments to create an enticing spread. These flavor pairings and plating techniques won’t only elevate the visual appeal but also enhance the overall dining experience.
Presentation Ideas
Consider enhancing the visual appeal of your freshly baked ciabatta bread rolls by incorporating creative baking and serving presentation ideas. When it comes to presenting your delicious rolls, attention to detail can make a significant difference. Here are some suggestions to elevate the presentation:
- Creative Plating: Experiment with different ways to arrange the ciabatta bread rolls on a serving platter. Try stacking them in a rustic manner or lining them up in a visually appealing pattern.
- Garnish Options: Add a pop of color and flavor by garnishing the rolls with fresh herbs like rosemary or thyme. You could also sprinkle some sesame seeds or sea salt on top for an extra touch of elegance.
- Personalized Serving Boards: Serve the ciabatta bread rolls on personalized wooden boards or rustic trays to create a cozy and inviting presentation that will impress your guests.
Frequently Asked Questions
Can I Use Whole Wheat Flour Instead of All-Purpose Flour?
You can use whole wheat flour instead of all-purpose in baking. It adds a nuttier flavor and extra nutrients. Remember, whole wheat flour absorbs more liquid, so adjust accordingly. Experiment for the best results!
How Can I Make the Rolls Gluten-Free?
If you’re aiming for gluten-free goodness, explore alternative flours like almond or coconut. Master baking techniques by adjusting liquid ratios and mixing methods. With precision and creativity, craft rolls that satisfy all tastebuds.
Can I Freeze the Dough for Later Use?
Yes, you can freeze dough for later use. Freezing dough allows for convenience and time-saving. However, some types of dough may require adjustments after freezing. Long-term storage options like wrapping in plastic wrap and placing in a freezer-safe container are recommended.
What Can I Substitute for Yeast in This Recipe?
When you crave bread but lack yeast, consider baking soda for a quick rise. Embrace sourdough starter for a tangy touch. Swap in self-rising flour for an effortless alternative. Your options are vast.
Can I Add Herbs or Cheese to the Dough for Extra Flavor?
You can absolutely customize your dough by adding herbs for an herb-infused flavor or cheese for cheese-filled rolls. These flavorful additions will elevate your ciabatta bread, giving you the freedom to create a delicious, personalized recipe.
Conclusion-Ciabatta Bread Rolls Recipe
To sum up, these ciabatta bread rolls are a delightful addition to any meal, with their crispy crust and airy interior.
Just like a symphony conductor expertly guiding a performance, the process of making these rolls requires precision and attention to detail.
So next time you want to impress your guests or simply treat yourself to a delicious homemade bread, give this recipe a try and enjoy the symphony of flavors and textures it brings to the table.