

Looking to unleash your inner bread artist? Look no further than this Bread Braid Recipe!
Imagine the satisfaction of creating a golden-brown masterpiece, perfectly braided and bursting with flavor. With just a handful of ingredients and a little bit of patience, you can craft a loaf that will have your taste buds singing with joy.
This recipe is perfect for those who crave the freedom of creating something beautiful and delicious from scratch. No need to be intimidated – we’ll guide you through each step, ensuring your bread turns out soft, fluffy, and utterly irresistible.
So grab your apron and get ready to embark on a delicious journey with our Bread Braid Recipe!

Contents
- 1 Key Takeaways
- 2 Ingredients for the Bread Braid Recipe
- 3 Step-by-step Instructions for Braiding the Bread
- 4 Tips for Achieving a Soft and Flavourful Bread
- 5 Bread Braid Recipe
- 6 Baking and Serving Suggestions for the Bread Braid
- 7 Variations and Customizations for the Bread Braid Recipe
- 8 Frequently Asked Questions
- 9 Nutritional Facts:-
- 10 Can I Use the Bread Braid Recipe to Make Apple Scrapple Bread?
- 11 Conclusion
Key Takeaways
- Ingredients for the bread braid include all-purpose flour, sugar, salt, active dry yeast, and warm water.
- The bread braid can be filled with classic combinations like ham and cheese or creative options like spinach and feta.
- The bread can be braided using either the three-strand or four-strand braid technique, following step-by-step instructions.
- Tips for achieving a soft and flavorful bread include using a gentle touch when kneading, incorporating ingredients like milk or yogurt, brushing with an egg wash or milk, and developing gluten for a light texture.
Ingredients for the Bread Braid Recipe
To begin making the bread braid, gather the following ingredients. You’ll need 3 cups of all-purpose flour, 2 tablespoons of sugar, 1 teaspoon of salt, 2 and a half teaspoons of active dry yeast, 1 cup of warm water, 2 tablespoons of olive oil, and 1 egg for the egg wash.
These ingredients will come together to create a soft and pliable dough that’s perfect for shaping into a beautiful braid.
Now, let’s talk about the different types of fillings you can use for your bread braid. You can go for a classic combination of ham and cheese, or get creative with spinach and feta. The possibilities are endless, so feel free to experiment with different flavors and textures.
Once you have all your ingredients ready, let’s move on to the step-by-step instructions for braiding the bread.
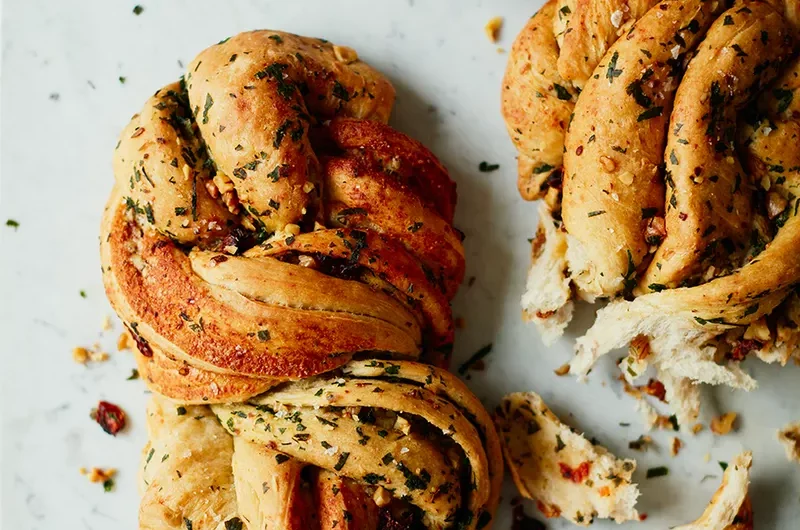
Step-by-step Instructions for Braiding the Bread
To braid the bread, start by dividing the dough into three equal portions. This will allow you to create a beautiful, braided loaf that will impress your friends and family.
There are different braiding techniques you can use, depending on the style you want to achieve. One technique is the simple three-strand braid, where you cross the outer strands over the center strand, alternating sides until the braid is complete.
Another technique is the four-strand braid, which involves crossing the outer strands over two center strands, alternating sides until the braid is complete.
When braiding the bread, it’s important to avoid common mistakes such as pulling the strands too tightly or not braiding evenly. By following these step-by-step instructions and avoiding these common mistakes, you’ll be able to create a beautifully braided loaf of bread that will be the star of any meal.
Tips for Achieving a Soft and Flavourful Bread
To achieve a soft and flavorful bread, you should utilize the proper techniques and ingredients. When it comes to kneading the dough, it’s important to use a gentle yet firm touch. This will help develop the gluten and create a light and airy texture.
You can also try incorporating different ingredients such as milk or yogurt, which will add moisture and enhance the flavor of the bread. Another tip is to create a shiny and golden crust on the bread. To achieve this, you can brush the dough with an egg wash or milk before baking. This will give your bread a beautiful and appetizing appearance.
By following these techniques, you can ensure that your bread braid turns out soft, flavorful, and visually appealing.
Now that you know how to achieve a soft and flavorful bread, let’s move on to baking and serving suggestions for the bread braid.
Bread Braid Recipe
Course: Appetizers, SidesCuisine: International, BakingDifficulty: Medium4
servings30
minutes2
hours30
minutes300
kcalElevate your baking prowess with our Artful Bread Braid Recipe. This delightful creation is not just a treat for the taste buds but also a feast for the eyes. With a perfect balance of softness and crunch, the bread braid is a versatile masterpiece suitable for both casual gatherings and special celebrations.
Ingredients
4 cups all-purpose flour
1/4 teaspoons active dry yeast
1 tablespoon sugar
1/2 teaspoons salt
1/2 cups warm water
2 tablespoons olive oil
Your choice of fillings (sweet or savory)
Directions
- In a bowl, dissolve sugar in warm water and add yeast. Allow it to sit for 5 minutes until frothy.
- In a large mixing bowl, combine flour and salt.
- Make a well in the center and pour in the yeast mixture.
- Mix until a dough forms, then knead on a floured surface for 8-10 minutes until smooth.
- Place the dough in an oiled bowl, cover, and let it rise in a warm place for 1 hour or until doubled in size.
- Roll out the dough into a rectangle, add your chosen fillings, and carefully braid it.
- Place on a baking sheet, cover, and let it rise for another 30 minutes.
- Preheat the oven, brush with olive oil, and bake until golden brown.
Baking and Serving Suggestions for the Bread Braid
Now let’s talk about how you can bake and serve your delicious bread braid.
When it comes to baking techniques, the key is to preheat your oven to the specified temperature and place the bread braid on a parchment-lined baking sheet. To achieve a golden, crispy crust, you can brush the braid with an egg wash before baking.
As for presentation ideas, you can sprinkle sesame seeds, poppy seeds, or even grated cheese on top of the braid before baking for added flavor and visual appeal.
Once your bread braid is baked to perfection, let it cool for a few minutes before slicing. The beautiful braided pattern will impress your guests, and the warm, aromatic bread will be a delightful addition to any meal.
Enjoy!
Variations and Customizations for the Bread Braid Recipe
Get creative and personalize your bread braid recipe with these variations and customizations. Take your bread to the next level by experimenting with different flavorful fillings and shaping techniques. Here are some ideas to inspire you:
- Fillings: Add delicious and unique flavors to your bread braid by incorporating flavorful fillings. Consider options like spinach and feta cheese, sun-dried tomatoes and mozzarella, or caramelized onions and Gruyere. The possibilities are endless!
- Shaping Techniques: Get creative with the shape of your bread braid. Try a classic braid, or experiment with a twisted or knotted design. You can even shape it into a wreath or a braided loaf for a more decorative presentation.
- Sweet Variations: Don’t limit yourself to savory fillings. Explore sweet variations by using ingredients like Nutella and bananas, cinnamon sugar and raisins, or a cream cheese and berry filling.
With these variations and customizations, you can create a bread braid that perfectly suits your taste and style. Let your imagination run wild and enjoy the freedom of customizing your recipe!
Frequently Asked Questions
Can I Use a Different Type of Flour for the Bread Braid Recipe?
Nutritional Facts:-
Calories: Approximately 200 per serving (based on a moderate serving size)
Protein: 5g
Carbohydrates: 30g
Fat: 8g
Saturated Fat: 1g
Cholesterol: 0mg
Fiber: 2g
Sugar: 1g
Sodium: 300mg
You can definitely switch up the type of flour for the bread braid recipe. Experiment with different flours, like almond or whole wheat, to add a unique twist to your bread. Get creative and enjoy the freedom to explore new flavors!
Can I Substitute the Sugar With a Sugar Alternative?
Sure, you can definitely substitute the sugar with a sugar alternative in your bread braid recipe. It’s a great way to reduce your sugar intake while still enjoying the same delicious flavor.
Can I Make the Bread Dough Ahead of Time and Refrigerate It Overnight?
Sure, you can make the dough ahead of time and refrigerate it overnight. This allows the flavors to develop and gives you more flexibility in your baking schedule. It’s a great technique to save time and still enjoy delicious homemade bread.
Can I Freeze the Bread Braid After It Has Been Baked?
Yes, you can freeze the bread braid after it’s baked! It’s a great option for preserving it for later. When you’re ready to enjoy it, simply thaw and warm it up for a delicious treat.
Can I Add Additional Fillings, Such as Chocolate Chips or Raisins, to the Bread Braid?
You can definitely get creative with your bread braid! Adding chocolate chips or raisins will bring a delightful burst of flavor and texture. And if you’re feeling adventurous, you can even try savory fillings for a unique twist!

Can I Use the Bread Braid Recipe to Make Apple Scrapple Bread?
Yes, you can definitely use the bread braid recipe to make apple scrapple bread. Simply follow the bread braid recipe as usual, but incorporate the apple scrapple bread recipe into the filling or topping to achieve a delicious fusion of flavors. Enjoy your unique creation!
Conclusion
In just a few simple steps, you can create a beautiful and delicious bread braid that will wow your family and friends.
With its soft and flavorful texture, this bread is sure to be a hit at any gathering.
Whether you stick to the classic recipe or get creative with your own variations, the options are endless.
So go ahead, give this bread braid a try and experience the joy of baking your own homemade bread.